

Look, I used to be a chicken breast person until I discovered properly baked chicken thighs. Now I can’t go back. They’re juicier, more flavorful, and honestly way harder to mess up.
Prep Time: 10 minutes
Cook Time: 40 minutes
Total Time: 50 minutes
Servings: 4-6 people
Why Chicken Thighs Win
Ever bite into dry, flavorless chicken breast and immediately regret your dinner choice? Yeah, that never happens with thighs. The extra fat keeps them moist and tender no matter what.
I cook chicken thighs at least twice a week now. They’re affordable, forgiving, and taste amazing with minimal effort. Perfect for busy weeknights when you need dinner fast.
The best part? They actually have flavor on their own. You don’t need to drown them in sauce to make them edible like you do with breasts.
What Makes This Recipe Special
This isn’t some complicated restaurant technique. It’s simple seasoning and proper baking that creates crispy skin and juicy meat every single time.
IMO, the key is high heat at the end. That’s what gets the skin perfectly crispy while keeping the inside tender. Most people mess this up.
You’ll get restaurant-quality results with ingredients you already have in your pantry. No special equipment, no weird techniques, just solid cooking fundamentals that work.
Ingredients You’ll Need
Let’s talk ingredients. Nothing fancy or expensive here. Just chicken thighs and seasonings that bring out their natural deliciousness.
For the chicken:
- 6 bone-in, skin-on chicken thighs
- 2 tablespoons olive oil
- 1 teaspoon salt
- 1/2 teaspoon black pepper
- 1 teaspoon garlic powder
- 1 teaspoon onion powder
- 1 teaspoon paprika
- 1/2 teaspoon dried thyme
- 1/2 teaspoon dried oregano
Optional additions:
- 1 lemon, sliced
- Fresh rosemary sprigs
- 4 cloves garlic, smashed
- Red pepper flakes for heat
Simple stuff that creates complex flavor. FYI, bone-in and skin-on are non-negotiable if you want the best results. Boneless just doesn’t compare.
Choosing Your Chicken Thighs
Always buy bone-in, skin-on thighs for this recipe. The bone adds flavor and helps regulate cooking. The skin gets crispy and delicious when baked properly.
Look for thighs that are similar in size. This ensures even cooking. Nothing worse than some thighs perfectly done while others are still raw.
Fresh is ideal, but frozen works fine too. Just thaw them completely in the fridge overnight. Never at room temperature—that’s asking for bacteria problems.
Check the sell-by date and make sure the packaging isn’t damaged. Quality ingredients make quality meals. Don’t cheap out on the main ingredient here.
Preparing The Chicken
Take your thighs out of the fridge 20 minutes before cooking. Room temperature chicken cooks more evenly than cold chicken straight from the fridge.
Pat them completely dry with paper towels. This is crucial for crispy skin. Moisture is the enemy of crispiness. Get them as dry as possible.
Trim any excess fat or loose skin. You want the skin taut and even. This helps it crisp up uniformly during baking.
Season both sides generously. Don’t be shy here. Chicken thighs can handle bold seasoning. They’re not delicate like breasts that get overwhelmed easily.
Making The Seasoning Mix
In a small bowl, combine your salt, black pepper, garlic powder, onion powder, paprika, thyme, and oregano. Mix everything together thoroughly.
This blend hits all the right notes—savory, slightly sweet from the paprika, and aromatic from the herbs. It’s my go-to seasoning for basically all chicken.
You can make a big batch of this seasoning and store it in an airtight container. Saves time during busy weeknights. Lasts for months.
Adjust the spices to your taste. Want more heat? Add cayenne. Prefer smokiness? Use smoked paprika instead. Make it your own.
Seasoning The Thighs
Drizzle olive oil over the chicken thighs. Use your hands to rub it all over, coating both sides. The oil helps the seasoning stick and promotes browning.
Sprinkle your seasoning mixture generously on both sides. Press it into the meat so it adheres properly. You want every bite to be flavorful.
Pay special attention to the skin side. That’s what people see first and what gets crispy. Make sure it’s well-seasoned and evenly coated.
Let the seasoned thighs sit for 5-10 minutes. This lets the salt start working its magic, drawing moisture to the surface for better browning.
Preparing The Baking Dish
Preheat your oven to 400°F. You want it fully heated before the chicken goes in. This ensures proper cooking from the start.
Choose a baking dish or sheet pan that fits the thighs comfortably without crowding. They need space for air circulation. Crowding makes them steam instead of roast.
Line your pan with parchment paper or lightly grease it. This prevents sticking and makes cleanup way easier. Trust me on this one.
If you’re adding lemon slices, garlic cloves, or herbs, scatter them in the pan now. The chicken will release juices that infuse these aromatics.
Arranging The Thighs
Place the chicken thighs skin-side up in the prepared pan. Space them at least an inch apart. Remember, air circulation is key for crispy skin.
Position the meatier part toward the outside of the pan. The edges get more heat, so thicker parts should be there for even cooking.
Tuck any loose skin under the thighs. You want a smooth, even surface. This promotes uniform crisping and prevents burned edges.
If using lemon and herbs, tuck them around and under the thighs. They’ll flavor the chicken as it cooks and create amazing pan juices.
The Baking Process
Slide the pan into your preheated 400°F oven. Set a timer for 35 minutes. Don’t open the oven door during this time—you’ll let heat escape.
The thighs will start releasing juices. That’s normal and good. Those juices combine with the seasonings to create flavor. Don’t drain them off.
After 35 minutes, check the internal temperature with a meat thermometer. You’re looking for 165°F in the thickest part. Don’t guess—use a thermometer.
If they’re not at temperature yet, give them another 5 minutes and check again. Better safe than sorry with poultry.
The Crispy Skin Trick
Once the thighs hit 165°F, turn on your broiler to high. Move the rack to about 6 inches from the heating element.
Broil the thighs for 2-3 minutes, watching them like a hawk. The skin will bubble and turn golden brown. This is where the magic happens.
Don’t walk away during broiling. The line between perfectly crispy and burned is about 30 seconds. Stay present and watch carefully.
When the skin is golden and crispy, pull them out immediately. Let them rest for 5 minutes before serving. This lets the juices redistribute.
Checking For Doneness
Use a meat thermometer to check the thickest part of the thigh. It should read 165°F minimum. This ensures food safety without overcooking.
The juices should run clear when you pierce the meat. Pink juices mean it needs more time. Clear juices mean it’s ready.
The meat should pull away from the bone easily. If it’s still clinging tight, it needs a few more minutes in the oven.
Crispy, golden-brown skin is your visual cue. Combined with the right temperature, you’ve got perfectly cooked chicken thighs.
Serving Suggestions
Let the thighs rest for 5 minutes before serving. This is crucial. Cutting immediately makes all the juices run out, leaving dry meat.
Serve them with roasted vegetables for a complete meal. Potatoes, carrots, and Brussels sprouts all roast beautifully alongside the chicken.
Drizzle any pan juices over the thighs before serving. Those juices are packed with flavor from the seasonings and the chicken itself.
A squeeze of fresh lemon brightens everything up. The acidity cuts through the richness perfectly. Simple but effective finishing touch.
Storage And Reheating
Store leftover thighs in an airtight container in the fridge for up to four days. They stay moist and delicious even as leftovers.
Reheat in a 350°F oven for 10-15 minutes. This keeps them juicy and re-crisps the skin slightly. Microwave makes them rubbery.
You can freeze cooked thighs for up to three months. Wrap them individually in plastic wrap, then foil. Thaw in the fridge before reheating.
Cold leftover chicken thighs are amazing in salads or sandwiches. The flavor is there even when they’re cold. Versatile leftovers for sure.
Flavor Variations
Try different seasoning blends for variety. Italian seasoning with lemon and garlic creates Mediterranean vibes. Cumin and chili powder go Southwest.
Make them Asian-inspired with soy sauce, ginger, and sesame oil. Bake the same way but brush with sauce during the last 10 minutes.
Go spicy with cayenne, hot paprika, and a bit of brown sugar. The sugar caramelizes and balances the heat. Addictively good.
Herb-crusted thighs using fresh herbs like rosemary, thyme, and sage taste incredible. Chop herbs fine and press them into the skin before baking.
Why Thighs Beat Breasts
Chicken thighs cost less than breasts in most stores. You’re getting better flavor and texture for less money. Economic and delicious.
The higher fat content means they stay juicy even if you slightly overcook them. Breasts dry out if you look at them wrong.
Dark meat has more flavor naturally. You don’t need to mask it with heavy sauces or complicated preparations. The meat speaks for itself.
They’re more forgiving for beginner cooks. You can make mistakes and still end up with something tasty. Breasts don’t offer that safety net.
Common Mistakes To Avoid
Don’t use boneless, skinless thighs for this recipe. You lose all the benefits—the crispy skin and the flavor from the bone. Save those for stir-fries.
Avoid overcrowding the pan. The thighs need space to roast properly. Crowding makes them steam and you’ll never get crispy skin.
Don’t skip patting them dry. Wet chicken skin will never crisp up no matter how high your oven temperature. Moisture is the enemy.
Stop opening the oven door constantly. Each time you open it, you drop the temperature and extend cooking time. Set a timer and trust it.
FAQs
Can I use boneless chicken thighs?
You can, but reduce cooking time to 25-30 minutes. They cook faster without the bone. You’ll also miss out on the flavor the bone adds.
Do I need to flip them while baking?
Nope. Start skin-side up and leave them that way. Flipping makes the skin soggy and defeats the whole purpose of getting it crispy.
Can I marinate these first?
Absolutely. Marinate for 2-24 hours in the fridge. Just pat them dry before seasoning and baking, or the skin won’t crisp properly.
What if I don’t have a meat thermometer?
Get one—they’re cheap and essential for food safety. Until then, pierce the thickest part and check that juices run clear, not pink.
How do I make the skin extra crispy?
Pat them super dry, use enough oil, and definitely finish under the broiler. Starting at room temperature helps too. These tips together create perfect crispy skin.
Can I add vegetables to the pan?
Yes, but add heartier vegetables like potatoes or carrots. Delicate vegetables will burn. Toss them with oil and season them before adding.
Why is my chicken skin rubbery?
You didn’t dry it enough, the oven wasn’t hot enough, or you crowded the pan. Crispy skin needs dry surface, high heat, and space.
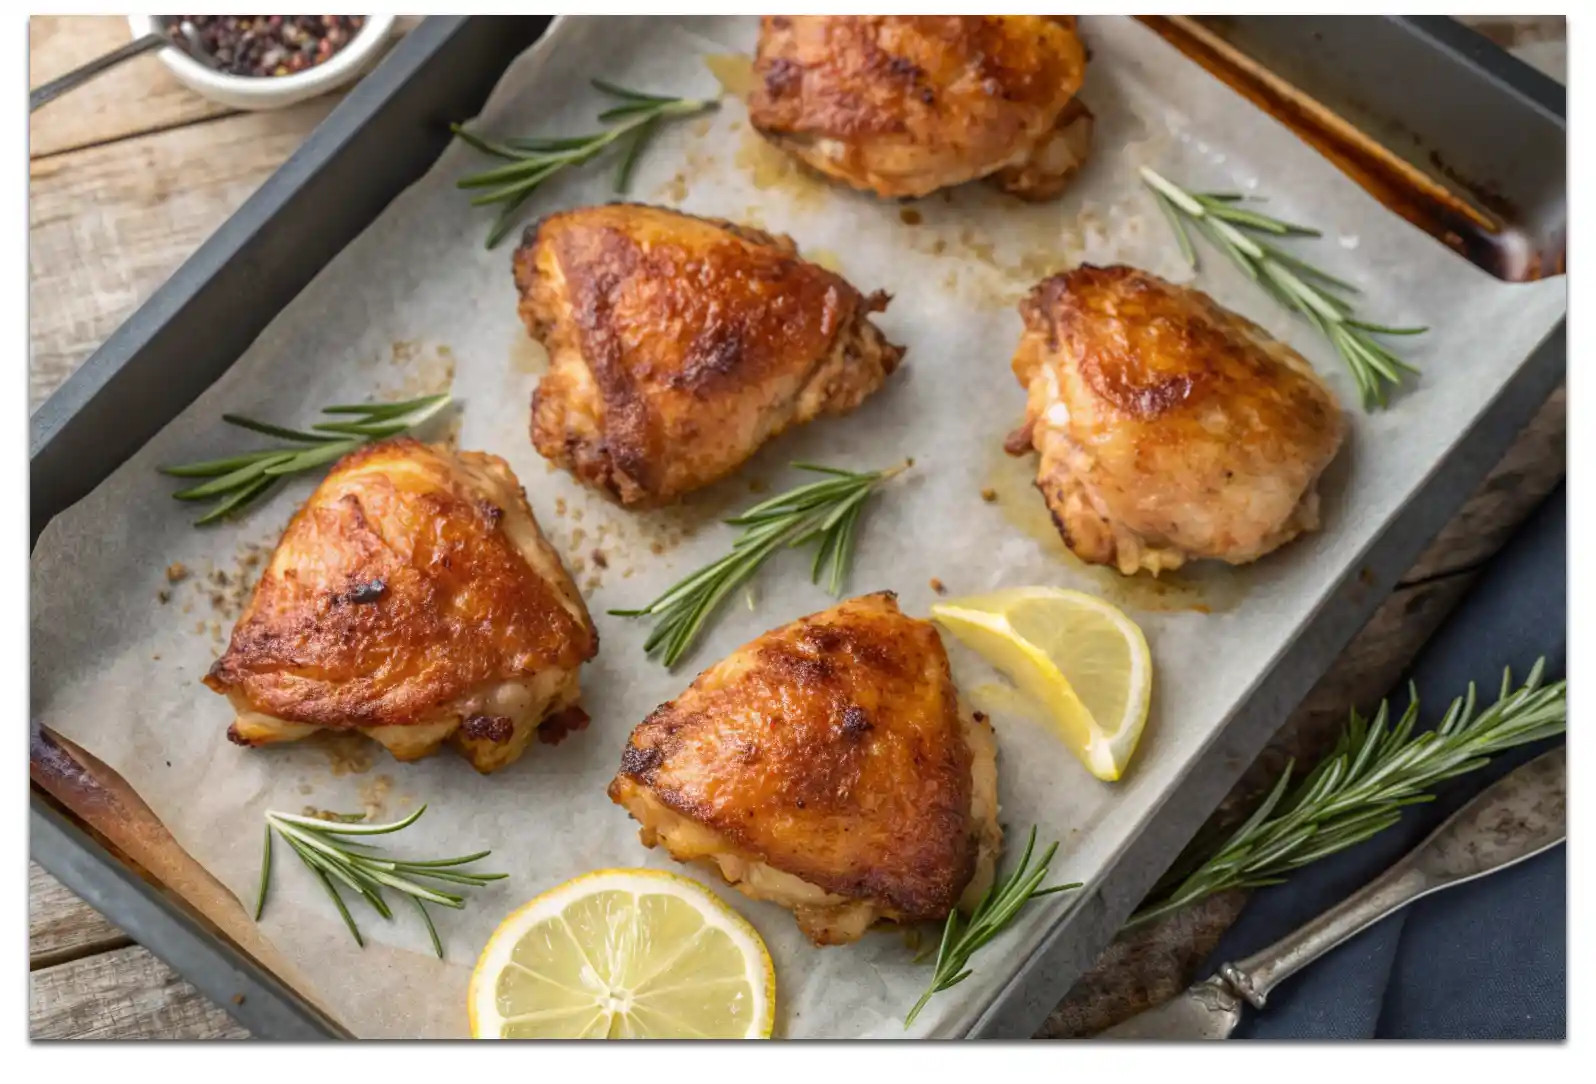
Baked Chicken Thighs Recipe: Juicy Perfection Every Time
4
servings1
hour10
minutesPerfectly baked bone-in, skin-on chicken thighs seasoned with savory spices and baked until the meat is juicy and the skin is crispy. Takes 50 minutes total with minimal hands-on time. Serves 4-6 people. Finishing under the broiler creates restaurant-quality crispy skin. Simple, affordable, and foolproof weeknight dinner.
Ingredients
-
6 bone-in, skin-on chicken thighs
-
2 tablespoons olive oil
-
1 teaspoon salt
-
1/2 teaspoon black pepper
-
1 teaspoon garlic powder
-
1 teaspoon onion powder
-
1 teaspoon paprika
-
1/2 teaspoon dried thyme
-
1/2 teaspoon dried oregano
-
Optional: lemon slices, fresh rosemary, garlic cloves
How To Make Baked Chicken Thighs
- Remove chicken from fridge 20 minutes before cooking
- Preheat oven to 400°F
- Pat chicken thighs completely dry with paper towels
- Trim excess fat and loose skin
- Mix all seasonings in small bowl
- Drizzle olive oil over thighs
- Rub oil all over both sides
- Sprinkle seasoning generously on both sides
- Press seasoning into meat to adhere
- Let seasoned thighs sit 5-10 minutes
- Line baking pan with parchment paper
- Arrange thighs skin-side up with space between
- Add optional lemon, herbs, or garlic to pan
- Bake at 400°F for 35 minutes
- Check internal temperature reaches 165°F
- Turn broiler to high
- Broil 2-3 minutes until skin is crispy and golden
- Remove from oven immediately
- Let rest 5 minutes before serving
Final Thoughts
There you have it—perfectly baked chicken thighs that’ll make you wonder why you ever bothered with breasts. Simple, foolproof, and absolutely delicious every time.
Make these this week. Once you nail this recipe, you’ll have a reliable go-to dinner that never disappoints. Your family will thank you.
Stop overthinking dinner and just make these thighs. Crispy skin, juicy meat, minimal effort. That’s a winning combination in my book.