
If you’ve been searching for the perfect coconut cake recipe, your hunt ends right here. This isn’t just any cake—it’s the one that makes people ask for seconds before they’ve finished their first slice.
I’ve been making this best coconut cake for years, and it never fails to impress. Birthday parties, holidays, random Tuesday cravings—this cake handles every occasion beautifully.
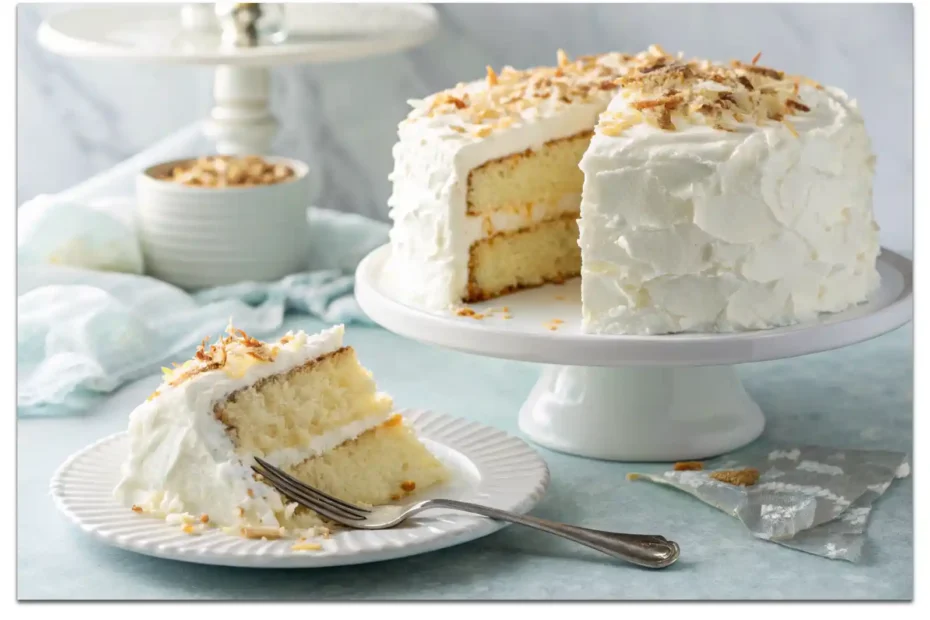
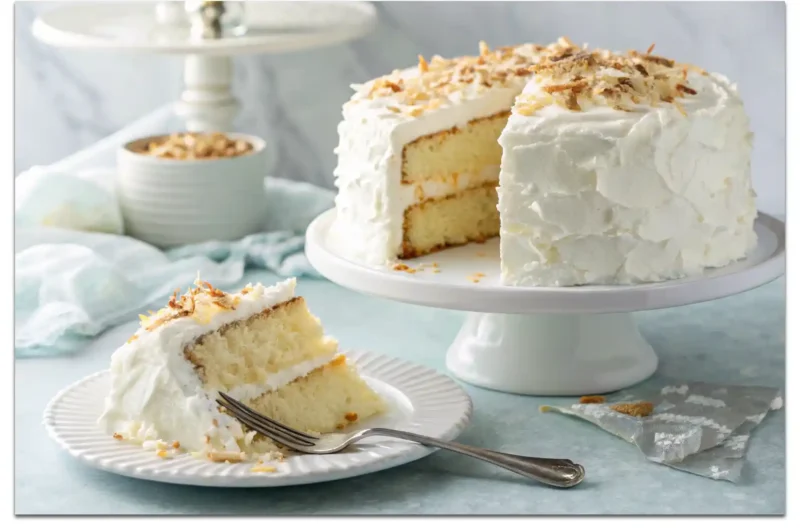
This homemade coconut cake features moist layers, coconut cream frosting, and toasted coconut flakes. It’s everything a coconut cake should be—rich, flavorful, and absolutely irresistible.
Prep Time: 30 minutes
Bake Time: 25-30 minutes
Cool Time: 1 hour
Total Time: 2 hours
Servings: 12 slices
Why This Coconut Cake Works
Most coconut cake from scratch recipes either turn out dry or lack real coconut flavor. This one solves both problems with coconut in multiple forms throughout.
The cake layers use coconut milk and shredded coconut for maximum flavor. The frosting doubles down with more coconut, creating that signature taste in every single bite.
Adding sour cream keeps the crumb incredibly moist without making it dense. It’s that perfect texture balance—light and fluffy but substantial enough to hold frosting beautifully.
IMO, this beats any bakery version because you control the sweetness and coconut intensity. Plus, fresh homemade cake just tastes better than anything that’s been sitting around.
Ingredients You’ll Need
Here’s everything for this easy coconut cake recipe simple enough for beginners. Nothing complicated—just straightforward baking ingredients you probably already have on hand.
For the Cake:
- 2 1/2 cups all-purpose flour
- 2 teaspoons baking powder
- 1/2 teaspoon baking soda
- 1/2 teaspoon salt
- 3/4 cup unsalted butter, softened
- 1 3/4 cups granulated sugar
- 4 large eggs, room temperature
- 1 cup coconut milk (canned, full-fat)
- 1/2 cup sour cream
- 2 teaspoons vanilla extract
- 1 teaspoon coconut extract
- 1 cup sweetened shredded coconut
Now For the Frosting:
- 1 cup unsalted butter, softened
- 4 cups powdered sugar
- 1/3 cup coconut cream (the thick part from canned coconut milk)
- 1 teaspoon vanilla extract
- 1 teaspoon coconut extract
- 2-3 tablespoons heavy cream
- Pinch of salt
For Assembly:
- 1 1/2 cups sweetened shredded coconut, toasted
Using full-fat coconut milk instead of light makes a massive difference. This is dessert—embrace the richness that makes it special and worth the calories.
How To Make The Best Homemade Coconut Cake
Alright, let’s break this down step by step. I’ll walk you through the process like we’re baking together in my kitchen right now.
Step 1: Prep Your Pans and Oven
Preheat your oven to 350°F (175°C). Position the racks in the center of your oven for even heat distribution during baking.
Grease two 9-inch round cake pans thoroughly with butter or cooking spray. Line the bottoms with parchment paper circles for foolproof cake release later.
Dust the greased pans lightly with flour, tapping out any excess. This double protection ensures your cakes come out cleanly without sticking anywhere.
Set your prepped pans aside while you make the batter. Having everything ready before mixing makes the whole process smoother and less stressful.
Step 2: Toast Your Coconut
Spread shredded coconut in an even layer on a baking sheet. Pop it in your preheated oven for 5-7 minutes, stirring every 2 minutes.
Watch it closely because coconut goes from golden to burnt in seconds. You want it evenly toasted to a light golden brown color throughout.
Once toasted, remove it immediately and let it cool completely. You’ll use some in the batter and save the rest for decorating the finished cake.
Toasted coconut adds so much more flavor than raw coconut. This small extra step makes the difference between good cake and incredible cake.
Step 3: Mix Dry Ingredients
In a medium bowl, whisk together the flour, baking powder, baking soda, and salt. Make sure everything is thoroughly combined with no lumps.
This dry mixing ensures your leavening agents distribute evenly throughout the flour. Uneven distribution means uneven rising, which creates a wonky cake nobody wants.
Sift this mixture if you want an extra-light texture, but honestly, a good whisking usually does the job perfectly fine for most home bakers.
Step 4: Cream Butter and Sugar
In a large bowl, beat the softened butter with an electric mixer on medium speed for about 2 minutes until it’s light and fluffy.
Gradually add the sugar while continuing to beat. Cream together for another 3-4 minutes until the mixture looks pale, fluffy, and almost doubled in volume.
This creaming process incorporates air that helps your cake rise and creates that tender, light crumb texture you’re after. Don’t rush this step.
Properly creamed butter and sugar should look almost white and feel light when you lift the beaters. That’s when you know it’s ready.
Step 5: Add Eggs One at a Time
Crack in your eggs one at a time, beating well after each addition. This gradual approach prevents the batter from curdling or separating.
Each egg should be fully incorporated before adding the next one. You’ll see the mixture get smoother and more cohesive with each addition.
After all eggs are in, mix in your vanilla and coconut extracts. The batter should look smooth, creamy, and uniform at this point.
Step 6: Combine Wet Ingredients
In a separate bowl or measuring cup, whisk together the coconut milk and sour cream until smooth. This wet mixture adds richness and moisture.
The sour cream might seem weird, but it’s the secret to keeping this simple coconut cake incredibly moist for days. Trust the process here.
Have this mixture ready to go before you start alternating additions. Organization makes the next step go much more smoothly and quickly.
Step 7: Alternate Additions
Add about a third of your flour mixture to the butter mixture. Mix on low speed just until the flour disappears—don’t overmix at all.
Pour in half of the coconut milk mixture. Mix just until combined, then repeat: flour, coconut milk, finishing with the final third of flour.
This alternating method prevents overmixing and creates the most tender crumb possible. Overmixing develops gluten, which makes cakes tough and dense instead of light.
Stop mixing the moment you don’t see flour streaks anymore. A few small lumps are fine—they’ll bake out. Overmixing is the bigger problem here.
Step 8: Fold in Coconut
Gently fold in one cup of the toasted shredded coconut using a spatula. Use a folding motion rather than stirring to keep the batter airy.
The coconut should be evenly distributed throughout the batter but still maintain some texture. You want to see those coconut flakes in every slice.
This is what makes it a real coconut loaf cake instead of just vanilla cake with coconut frosting. The flavor goes all the way through.
Step 9: Bake the Layers
Divide the batter evenly between your two prepared pans. Use a scale if you want to be precise, or just eyeball it—close enough works fine.
Smooth the tops with an offset spatula. Tap each pan gently on the counter a few times to release any air bubbles trapped in the batter.
Bake for 25-30 minutes until a toothpick inserted in the center comes out clean or with just a few moist crumbs. The tops should spring back when touched.
Don’t open the oven door for at least 20 minutes. Early opening causes cakes to sink in the middle, and nobody wants a crater cake.
Step 10: Cool Completely
Let the cakes cool in their pans for 10 minutes. This brief rest makes them easier to remove without breaking apart or sticking badly.
Run a knife around the edges, then invert onto wire racks. Peel off the parchment paper and let them cool completely—at least an hour minimum.
FYI, trying to frost warm cakes is a disaster. The frosting melts and slides everywhere. Patience here saves you massive frustration and disappointment later.
Step 11: Make the Frosting
Beat softened butter for 2-3 minutes until it’s creamy and light. The butter should be truly soft—not melted, not cold, but easily spreadable.
Gradually add powdered sugar one cup at a time, beating on low speed between additions. This prevents a sugar cloud from coating your entire kitchen.
Add the coconut cream, vanilla extract, coconut extract, and a pinch of salt. Beat on medium-high for 3-4 minutes until light and fluffy.
If the frosting is too thick, add heavy cream one tablespoon at a time. Too thin? Add more powdered sugar. You want spreadable but not runny.
Step 12: Assemble and Frost
Place one cooled cake layer on your serving plate. Spread about a cup of frosting evenly over the top, going all the way to the edges.
Position the second layer on top, making sure it’s level. Apply a thin crumb coat of frosting all over the cake—top and sides.
Refrigerate for 15 minutes to set the crumb coat. This seals in loose crumbs so your final frosting layer looks smooth and professional instead of messy.
Apply the remaining frosting generously, creating swirls or keeping it smooth—your choice. Either way looks great and tastes incredible, so go with your preference.
Step 13: Add Final Touches
Press toasted coconut flakes all over the sides and top of the frosted cake. Use your hands and gently press to make it stick.
Cover every visible bit of frosting with coconut for that classic look. This is what makes it look like a professional coconut birthday cake.
Refrigerate the finished cake for at least 30 minutes before slicing. This sets the frosting and makes cutting clean, beautiful slices so much easier.
Variations Worth Trying
Once you’ve mastered this easy coconut cake, these variations let you explore different flavors while keeping the same basic technique and structure.
Coconut Pineapple Cake: Fold 1/2 cup crushed pineapple (well-drained) into the batter. Add pineapple between layers too. Tropical paradise in cake form here.
Coconut Milk Cake (Lighter): Use all coconut milk instead of sour cream for a lighter, more distinctly coconut flavor throughout the entire cake.
White Coconut Cake Recipes: Use only egg whites instead of whole eggs for a pure white cake. Perfect for weddings or when aesthetics really matter.
Coconut Cake Using Box Cake: Start with a white cake mix, add coconut milk instead of water and fold in coconut. Makes it way easier.
You could even make this as coconut recipes dessert cupcakes instead. Same batter, just bake for 18-20 minutes in lined muffin tins for individual servings.
Comparing to Other Coconut Desserts
How does this stack up against other popular coconut dessert recipes? Let me break it down from years of baking different coconut treats.
Versus Coconut Cream Pie: Pie is richer and more custard-forward. This cake is lighter and more versatile for celebrations. Both excellent for different occasions.
Versus Coconut Macaroons: Macaroons are all coconut, very dense and chewy. This cake is tender and balanced—coconut flavor without overwhelming every sense.
Versus Tres Leches with Coconut: Tres leches is soaking wet and ultra-rich. This is moist but not soggy—easier to serve and transport too.
Versus German Chocolate Cake: German chocolate has that caramel-coconut-pecan topping. This showcases pure coconut flavor without competing elements throughout.
Each coconut dessert has fans, but this creamy coconut cake offers the best balance of flavor, texture, and celebration-worthy presentation for most occasions.
Storage and Make-Ahead Tips
Good news—this cake actually tastes better the next day. The flavors meld together and the texture somehow becomes even more moist overnight.
Room Temperature: Cover and keep at room temp for 1-2 days if your kitchen is cool. The frosting holds up fine without refrigeration for this time.
Refrigerator: Store covered for up to 5 days. Bring to room temperature 30 minutes before serving for the best flavor and texture experience.
Freezing: Wrap unfrosted layers tightly in plastic, then foil. Freeze for up to 3 months. Thaw overnight in fridge before frosting and assembling.
Make-Ahead: Bake layers a day ahead, wrap tightly, and store at room temperature. Make frosting the next day and assemble fresh for optimal results.
The assembled, frosted cake keeps beautifully in the fridge. Just let it sit out for 20-30 minutes before serving so the frosting softens slightly.
Common Mistakes to Avoid
I’ve messed this up enough times to know exactly what goes wrong. Here’s how to avoid the disasters that ruin perfectly good coconut cakes.
Using Light Coconut Milk: Full-fat is essential for moisture and flavor. Light version makes dry, bland cake that disappoints everyone who tries it.
Overmixing: Stop mixing the moment flour disappears. Overmixing creates tough, dense cake instead of the light, tender crumb you’re trying to achieve here.
Hot Cake Frosting: Never frost warm cakes. The frosting melts, slides off, and you end up with a mess. Cool completely before frosting, always.
Not Toasting Coconut: Raw coconut lacks depth and can taste flat. Toasting brings out natural sweetness and adds complexity that elevates the whole cake.
Skipping Parchment: Not using parchment means cakes might stick. You’ll end up with torn layers that are impossible to frost nicely or present well.
Pro Tips for Bakery-Quality Results
Want your homemade cake to rival professional bakeries? These expert tips make all the difference between good cake and absolutely spectacular cake.
Room Temperature Ingredients: Cold eggs and butter don’t mix smoothly. Everything should be room temp for at least 30 minutes before starting to bake.
Measure Flour Correctly: Spoon flour into measuring cups and level off. Scooping directly packs it down, giving you too much flour and dry cake.
Chill Coconut Cream: Put your coconut milk can in the fridge overnight. The thick cream rises to top—scoop that out for the richest frosting.
Level Your Layers: Use a serrated knife to slice off any domed tops. Flat layers stack better and create that professional, even appearance throughout.
Fresh Coconut Extract: Old extract loses potency. Fresh bottles deliver that signature coconut flavor that makes this cake special and worth making properly.
Perfect Occasions for Coconut Cake
This best coconut cake works for so many occasions. I’ve served it countless times and it always steals the show without fail.
Birthday Celebrations: The classic coconut birthday cake that everyone remembers. It’s festive, impressive, and photographs beautifully for social media posts.
Easter and Spring: The white, fluffy appearance feels fresh and seasonal. Plus, that coconut flavor screams spring and summer celebrations perfectly.
Weddings: As a groom’s cake or even main wedding cake. The white layers and elegant coconut covering look sophisticated enough for formal events.
Holidays: Christmas, Thanksgiving, or any family gathering. It’s different from typical holiday pies but still feels special and celebratory for the occasion.
This easy coconut cake icing technique works for any celebration. Once you master it, you’ll find excuses to make it constantly throughout the year.
Why Homemade Beats Store-Bought
After making this countless times, I’ll never buy grocery store coconut cake again. The difference in quality is honestly night and day here.
Flavor: Real coconut extract and coconut milk beat artificial flavoring by miles. You taste actual coconut, not chemical approximation of coconut flavor.
Texture: Homemade cake is moist and tender. Store-bought sits in plastic containers for days getting progressively drier and less appealing with time.
Freshness: You know exactly when you baked it. No mystery ingredients or preservatives needed to keep it shelf-stable for weeks on end.
Pride: Making it yourself brings satisfaction store-bought can’t match. Plus, everyone’s way more impressed when you mention you made it from scratch yourself.
The effort is minimal compared to the massive improvement in taste, texture, and wow factor. Once you go homemade, there’s really no turning back.
FAQs
Can I make this as a sheet cake instead of layers?
Absolutely! Use a 9×13 inch pan and bake for 35-40 minutes. Frost the top only for easier serving. Perfect for casual gatherings and potlucks.
How do I prevent the coconut from falling off?
Press it gently but firmly into the frosting while it’s still fresh and sticky. Refrigerate to set everything before transporting or serving to guests.
Can I use coconut oil instead of butter?
You can, but the texture and flavor will be different. Butter creates better structure and richer taste. Coconut oil makes it more dense overall.
Why did my cake turn out dry?
Probably overbaked or overmixed. Check for doneness at 25 minutes, and stop mixing the moment flour disappears. Also, make sure you’re using full-fat coconut milk.
Can I reduce the sugar?
You can reduce by 1/4 cup in the cake, but I wouldn’t go further. Sugar provides moisture and structure, not just sweetness in baking recipes.
Coconut Cake Recipe: The Showstopper Everyone Loves
12
Slices2
hoursThis homemade coconut cake features moist layers made with coconut milk and shredded coconut, filled and frosted with creamy coconut buttercream, then covered in toasted coconut flakes. Takes about 2 hours total including cooling time, serving 12 people with rich coconut flavor throughout every layer and bite.
Ingredients
- Cake:
-
2 1/2 cups all-purpose flour
-
2 teaspoons baking powder
-
1/2 teaspoon baking soda
-
1/2 teaspoon salt
-
3/4 cup unsalted butter, softened
-
1 3/4 cups granulated sugar
-
4 large eggs, room temperature
-
1 cup coconut milk (full-fat)
-
1/2 cup sour cream
-
2 teaspoons vanilla extract
-
1 teaspoon coconut extract
-
1 cup sweetened shredded coconut
- Frosting:
-
1 cup unsalted butter, softened
-
4 cups powdered sugar
-
1/3 cup coconut cream
-
1 teaspoon vanilla extract
-
1 teaspoon coconut extract
-
2-3 tablespoons heavy cream
-
Pinch of salt
- Assembly:
-
1 1/2 cups sweetened shredded coconut, toasted
How To Make
- Preheat oven to 350°F
- Grease and flour two 9-inch round pans, line with parchment
- Toast shredded coconut at 350°F for 5-7 minutes, stirring every 2 minutes
- Whisk together flour, baking powder, baking soda, and salt
- Beat butter for 2 minutes until fluffy
- Add sugar and cream together 3-4 minutes until pale
- Add eggs one at a time, beating after each
- Mix in vanilla and coconut extracts
- Whisk coconut milk and sour cream together
- Add flour mixture in three parts, alternating with coconut milk mixture
- Begin and end with flour mixture
- Fold in 1 cup toasted coconut gently
- Divide batter evenly between prepared pans
- Bake 25-30 minutes until toothpick comes out clean
- Cool in pans 10 minutes, then invert onto racks
- Cool completely (at least 1 hour)
- Beat softened butter 2-3 minutes until creamy
- Add powdered sugar gradually, one cup at a time
- Beat in coconut cream, extracts, and salt
- Beat 3-4 minutes until light and fluffy
- Adjust consistency with heavy cream if needed
- Place one cake layer on serving plate
- Spread 1 cup frosting on first layer
- Top with second layer
- Apply thin crumb coat over entire cake
- Refrigerate 15 minutes
- Frost generously with remaining frosting
- Press toasted coconut all over sides and top
- Refrigerate 30 minutes before slicing
Final Thoughts on Coconut Cake
So there you have it—everything you need to make incredible coconut cake from scratch. This recipe has been my go-to celebration cake for years now.
It’s impressive enough for special occasions but easy enough for regular weekends when you’re craving something special. The coconut flavor is perfectly balanced throughout.
Once you make this a few times, it becomes automatic. You’ll find yourself volunteering to bring dessert to every gathering because you know this always impresses.
Now stop reading and start baking. Your kitchen is about to smell like a tropical bakery, and your cake stand won’t be empty for long!