

Tired of boring chicken dinners? This coconut curry chicken will change your entire meal rotation. I’m not exaggerating—this dish has serious flavor and takes less time than scrolling through takeout menus.
I’ve been making this creamy coconut chicken for years now. It started when I got hooked on thai coconut curry at a local restaurant and decided to recreate it at home.
This recipe delivers rich, aromatic coconut curry sauce with tender chicken in under 45 minutes. It’s the perfect balance of creamy, spicy, and satisfying without being complicated.
Prep Time: 15 minutes
Cook Time: 25 minutes
Total Time: 40 minutes
Servings: 4-6 people
Why This Coconut Curry Chicken Works
Most coconut milk chicken recipes either taste bland or overwhelmingly spicy. This one hits that sweet spot where every flavor shines without overpowering anything else.
The secret is building layers of flavor—toasting spices, browning the chicken properly, and finishing with coconut milk to tie everything together harmoniously.
Using full-fat coconut milk creates that signature silky texture you get at Thai restaurants. Light coconut milk just doesn’t cut it here—you need the richness.
IMO, this beats most takeout versions because you control the spice level and can add extra veggies. Plus, it’s way cheaper and you know exactly what’s in it.
Ingredients You’ll Actually Need
Here’s what you need for this thai coconut chicken masterpiece. Everything’s easy to find at regular grocery stores—no hunting down obscure ingredients required.
For the Chicken:
- 1.5 lbs boneless chicken thighs or breasts, cut into bite-sized pieces
- 1 teaspoon salt
- 1/2 teaspoon black pepper
- 2 tablespoons vegetable oil
For the Curry:
- 1 tablespoon vegetable oil
- 1 medium onion, diced
- 4 cloves garlic, minced
- 1 tablespoon fresh ginger, grated
- 3 tablespoons red curry paste (adjust to taste)
- 1 tablespoon curry powder
- 1 teaspoon ground cumin
- 1 teaspoon turmeric
- 1 can (14 oz) coconut milk (full-fat)
- 1 cup chicken broth
- 1 tablespoon fish sauce
- 1 tablespoon brown sugar
- 1 red bell pepper, sliced
- 1 cup snap peas or green beans
- Fresh basil or cilantro for garnish
- Lime wedges for serving
The ingredient list looks long, but most of it’s spices you probably have. The curry paste does most of the heavy lifting flavor-wise anyway.
How To Make Perfect Coconut Curry Chicken
Alright, let’s get cooking. I’ll walk you through every step with all the details that actually matter for getting this right on your first try.
Step 1: Prep Your Ingredients
Cut your chicken into uniform bite-sized pieces, about 1-1.5 inches each. This ensures even cooking and makes eating easier—nobody wants to wrestle with huge chunks.
Season the chicken pieces with salt and pepper. Let them sit at room temperature while you prep everything else—about 10 minutes works perfectly.
Dice your onion, mince the garlic, and grate the ginger. Having everything prepped before you start cooking makes the process so much smoother and less stressful.
Slice your bell pepper and trim your snap peas. Get all your spices measured out and your coconut milk ready to pour. Organization is key here.
Step 2: Brown the Chicken
Heat 2 tablespoons of oil in a large, deep skillet or Dutch oven over medium-high heat. You want it hot but not smoking.
Add your chicken pieces in a single layer, working in batches if necessary to avoid overcrowding. Overcrowding steams the chicken instead of browning it properly.
Cook for 3-4 minutes per side until golden brown but not cooked through. You’re building flavor through caramelization, not fully cooking it yet.
Transfer the browned chicken to a plate and set it aside. Don’t worry that it’s not done—it’ll finish cooking in the curry sauce later.
Step 3: Sauté Aromatics
Lower the heat to medium and add another tablespoon of oil to the same pan. You want all those browned bits from the chicken still there.
Add your diced onion and cook for 4-5 minutes, stirring occasionally. The onion should soften and start turning translucent but not brown yet.
Toss in the minced garlic and grated ginger. Cook for about 1 minute, stirring constantly so the garlic doesn’t burn and turn bitter.
Your kitchen should smell absolutely incredible right now. That’s the aromatics doing their job—building that flavor foundation for the entire dish.
Step 4: Toast the Spices
Add your curry paste to the pan and stir it into the onion mixture. Cook for about 1-2 minutes until it becomes fragrant and darkens slightly.
Sprinkle in the curry powder, cumin, and turmeric. Stir everything together and cook for another 30 seconds to toast the dried spices.
Toasting spices in oil releases their essential oils and intensifies flavors dramatically. This step separates good curry from amazing curry—don’t skip it.
The curry paste should coat everything evenly and you’ll see oil starting to separate around the edges. That’s when you know it’s ready for liquid.
Step 5: Build the Curry Sauce
Pour in your coconut milk and chicken broth. Stir everything together, scraping up all those flavorful browned bits stuck to the bottom of the pan.
Those bits add incredible depth to your coconut curry sauce. They’re pure concentrated flavor that you definitely don’t want to waste or leave behind.
Add the fish sauce and brown sugar. Stir until the sugar dissolves completely and everything is well combined into a smooth sauce.
Bring the mixture to a simmer over medium heat. It should be gently bubbling but not boiling aggressively—we’re building flavor, not rushing anything.
Step 6: Cook the Chicken
Return your browned chicken pieces to the pan along with any juices that accumulated on the plate. Submerge them in the sauce.
Reduce heat to medium-low and let everything simmer for 10-12 minutes. The chicken needs to cook through completely while absorbing all those amazing flavors.
Stir occasionally to make sure nothing sticks to the bottom. The sauce should thicken slightly as it reduces and the chicken releases its juices.
Check that the chicken is cooked through by cutting into a thick piece. It should be white throughout with no pink remaining inside.
Step 7: Add Vegetables
Toss in your sliced bell peppers and snap peas. Stir them into the sauce so they’re evenly distributed and coated.
Cook for another 5-7 minutes until the vegetables are tender-crisp. You want them cooked but still with a slight bite—not mushy or overcooked.
The vegetables add color, texture, and freshness that balances the rich coconut milk curry. They also make this feel like a more complete, well-rounded meal.
If your sauce seems too thick at this point, add a splash of chicken broth or water. Too thin? Let it simmer uncovered a bit longer.
Step 8: Final Seasoning
Taste your curry and adjust the seasoning. You might need more salt, a squeeze of lime juice for brightness, or extra curry paste for heat.
Every palate is different, and curry paste brands vary in spiciness. Make it work for you—this is your dinner, not mine or anyone else’s.
If it’s too spicy, add a bit more coconut milk or a teaspoon of sugar. Too bland? More fish sauce or salt fixes that quickly.
Remove from heat once you’re happy with the flavor. Let it rest for 2-3 minutes before serving—this lets the flavors settle and meld together.
Step 9: Garnish and Serve
Ladle the coconut curry chicken over steamed rice or with naan bread. Rice soaks up that amazing sauce—you don’t want to waste a single drop.
Garnish with fresh basil or cilantro and serve lime wedges on the side. That fresh herb and citrus brightness cuts through the richness perfectly.
FYI, jasmine rice is traditional for thai coconut curry, but basmati or even cauliflower rice works great if you’re watching carbs or trying something different.
Variations Worth Trying
Once you’ve nailed this basic coconut curry recipes template, these variations let you mix things up without learning completely new techniques.
Crockpot Curry Chicken: Throw everything except vegetables into a slow cooker. Cook on low for 6 hours, add veggies in the last 30 minutes. Done.
Healthy Chicken Curry: Use chicken breast instead of thighs and add more vegetables like cauliflower, carrots, and spinach. Same great flavor, more nutrients.
Extra Creamy: Add 2 tablespoons of peanut butter or cashew butter with the coconut milk. Creates an even richer, nuttier curry that’s absolutely incredible.
Spicy Version: Double the curry paste and add fresh Thai chilies or red pepper flakes. Some like it hot—make it as fiery as you want.
You could even turn this into other curry dishes by swapping proteins. Shrimp, tofu, or chickpeas all work beautifully with the same coconut milk recipes base.
Comparing to Other Curry Recipes
How does this stack up against other popular curry chicken recipes you might know? Let me break it down from someone who’s tried them all.
Versus Indian Butter Chicken: Butter chicken uses tomatoes and cream, no coconut. This is lighter and more aromatic. Both excellent, totally different flavor profiles here.
Versus Japanese Curry: Japanese curry is thicker and sweeter with a gravy-like consistency. This is saucier and more complex with fresh aromatics throughout.
Versus Green Curry: Green curry is tangier and herbier with Thai basil. This red curry version is richer and slightly sweeter. Choose based on mood.
Versus Massaman Curry: Massaman includes peanuts and potatoes, making it heartier. This is lighter and focuses on that coconut-curry flavor combination primarily.
Each curry style has fans, but this coconut chicken version offers the best balance of richness and brightness for everyday cooking at home.
Storage and Meal Prep Tips
Good news—this curry recipes easy dish actually tastes better the next day. The flavors have time to develop and meld together even more beautifully.
Refrigerator: Store in an airtight container for up to 4 days. Reheat gently on the stove or in the microwave, stirring occasionally until heated through.
Freezing: The sauce freezes beautifully for up to 3 months. I’d recommend slightly undercooking the vegetables if you plan to freeze it.
Meal Prep: Make a double batch on Sunday. Pack it with rice in meal prep containers for easy grab-and-go lunches all week long.
Reheating: Add a splash of coconut milk or broth when reheating to refresh the sauce. It thickens as it sits, so that extra liquid brings it back.
The chicken curry with rice combo reheats perfectly together. I actually prefer eating this as leftovers because the flavors intensify so much overnight.
Common Mistakes to Avoid
I’ve messed this up enough times to know exactly what goes wrong. Here’s how to avoid the disasters that ruin perfectly good coconut milk curry.
Using Light Coconut Milk: Full-fat is essential for that creamy texture and rich flavor. Light version tastes watery and thin—definitely not worth the calorie savings.
Not Browning Chicken: Skipping the browning step means missing out on depth and complexity. Those caramelized bits add serious flavor you can’t get otherwise.
High Heat: Cooking curry sauce at high heat can cause the coconut milk to separate and look curdled. Medium to medium-low heat keeps everything smooth.
Overcooking Vegetables: Mushy veggies ruin the texture. Add them near the end and cook just until tender-crisp—they continue softening in the residual heat.
Bland Seasoning: Curry paste intensity varies by brand. Always taste and adjust at the end—your sauce should be bold and flavorful, not boring.
Perfect Side Dishes
This creamy coconut chicken pairs beautifully with so many sides. Here are my go-to combinations after making this dish at least a hundred times.
Jasmine Rice: Classic choice that soaks up the sauce perfectly. Fluffy, slightly sticky, aromatic—it’s the traditional pairing for good reason here.
Naan Bread: Perfect for scooping up sauce. Warm it in the oven or on the stovetop for that authentic restaurant experience at home.
Cauliflower Rice: For a lower-carb option that still provides that rice-like texture. It absorbs the curry sauce well without being too heavy overall.
Cucumber Salad: Fresh cucumbers with rice vinegar provide cooling contrast to the rich, spicy curry. The crunch and acidity balance everything beautifully.
Mango Lassi: Not a side dish but the perfect drink pairing. The sweet, creamy yogurt drink complements the spicy curry sauce incredibly well.
Why Homemade Beats Takeout
After making this hundreds of times, I’ve realized this home version consistently beats restaurant takeout. Here’s why you should make it yourself.
Control: Adjust spice levels, add more protein, pile in extra vegetables. Restaurants give you what they give you—no customization without annoying everyone.
Freshness: You know exactly when everything was cooked and what went into it. No mystery ingredients or day-old sauce reheated in the microwave.
Cost: This recipe costs maybe fifteen dollars and feeds 4-6 people. That’s one or two takeout orders max. The savings add up fast over time.
Quality Ingredients: Use organic chicken, high-quality curry paste, and fresh vegetables. You control the quality of every single component in this dish.
Honestly, once you get the hang of this, it’s faster than waiting for delivery. Forty minutes from start to finish beats most takeout timing anyway.
Pro Tips for Restaurant-Quality Results
Want your homemade curry to rival the best Thai restaurant in town? These expert tips make all the difference in final results.
Good Curry Paste: Invest in quality Thai curry paste. Mae Ploy or Thai Kitchen brands work great. Cheap curry paste tastes like nothing no matter what.
Fresh Aromatics: Don’t use jarred garlic or pre-ground ginger. Fresh makes a massive difference in brightness and complexity. Take the extra minute to prep.
Don’t Skip Fish Sauce: I know it smells weird, but it adds umami depth that’s irreplaceable. Just a tablespoon transforms the entire flavor profile.
Full-Fat Everything: Use full-fat coconut milk and don’t trim all the fat off your chicken. This is curry—embrace the richness that makes it special.
Rest Before Serving: Let the curry sit off heat for a few minutes. Flavors meld together and the sauce thickens to perfect consistency naturally.
FAQs
Can I use chicken breast instead of thighs?
Absolutely! Breasts work fine, just watch the cooking time carefully so they don’t dry out. Thighs are more forgiving and stay juicier, but breasts are perfectly acceptable.
How spicy is this curry?
That depends entirely on your curry paste amount. Start with 2 tablespoons for mild, 3 for medium, 4+ for hot. You control the heat level completely.
Can I make this vegetarian?
Yes! Replace chicken with tofu, chickpeas, or extra vegetables. Use vegetable broth instead of chicken broth. Everything else stays exactly the same.
What if I don’t have curry paste?
You can use curry powder only, but the flavor won’t be as complex or authentic. Curry paste contains lemongrass, galangal, and other aromatics powder lacks.
How do I thicken the sauce?
Simmer it longer uncovered to reduce, or mix 1 tablespoon cornstarch with water and stir it in. Cook for 2 minutes until thickened to desired consistency.
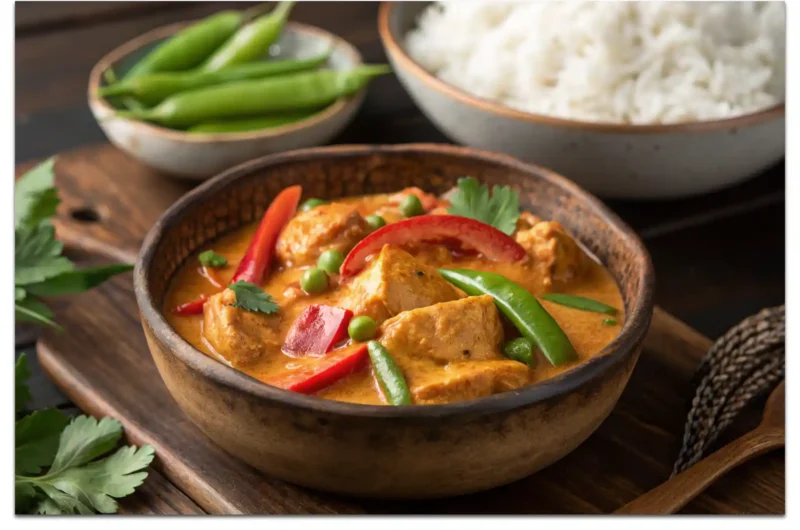
Coconut Curry Chicken Recipe
4-6
servings40
minutesThis coconut curry chicken features tender chicken pieces simmered in a rich, aromatic sauce made with coconut milk, red curry paste, and warming spices. Ready in 40 minutes with colorful vegetables added at the end, it’s creamy, flavorful, and perfect served over jasmine rice for an easy weeknight dinner.
Ingredients
- Chicken:
-
1.5 lbs boneless chicken thighs or breasts, bite-sized pieces
-
1 teaspoon salt
-
1/2 teaspoon black pepper
-
2 tablespoons vegetable oil
- Curry:
-
1 tablespoon vegetable oil
-
1 medium onion, diced
-
4 cloves garlic, minced
-
1 tablespoon fresh ginger, grated
-
3 tablespoons red curry paste
-
1 tablespoon curry powder
-
1 teaspoon ground cumin
-
1 teaspoon turmeric
-
1 can (14 oz) full-fat coconut milk
-
1 cup chicken broth
-
1 tablespoon fish sauce
-
1 tablespoon brown sugar
-
1 red bell pepper, sliced
-
1 cup snap peas or green beans
-
Fresh basil or cilantro
-
Lime wedges
How To Make Coconut Curry Chicken
- Cut chicken into bite-sized pieces
- Season chicken with salt and pepper
- Dice onion, mince garlic, grate ginger
- Slice bell pepper and trim snap peas
- Heat 2 tablespoons oil in large skillet over medium-high heat
- Brown chicken pieces 3-4 minutes per side
- Transfer chicken to plate and set aside
- Lower heat to medium, add 1 tablespoon oil
- Sauté onion 4-5 minutes until softened
- Add garlic and ginger, cook 1 minute
- Add curry paste, cook 1-2 minutes until fragrant
- Add curry powder, cumin, turmeric, toast 30 seconds
- Pour in coconut milk and chicken broth
- Scrape up browned bits from bottom of pan
- Add fish sauce and brown sugar, stir to dissolve
- Bring to simmer over medium heat
- Return chicken to pan with accumulated juices
- Reduce heat to medium-low, simmer 10-12 minutes
- Add bell peppers and snap peas
- Cook 5-7 minutes until vegetables are tender-crisp
- Taste and adjust seasoning as needed
- Remove from heat and rest 2-3 minutes
- Serve over rice, garnish with fresh herbs and lime wedges
Final Thoughts on Coconut Curry Chicken
So there you have it—everything you need to make incredible coconut curry chicken at home. This recipe has become a staple in my kitchen for good reason.
It’s quick enough for weeknights but impressive enough for dinner guests. The flavors are complex and satisfying without requiring advanced cooking skills or weird ingredients.
Once you make this a few times, it becomes second nature. You’ll find yourself craving it constantly and making it way more often than ordering takeout.
Now stop reading and start cooking. Your kitchen is about to smell like a Thai restaurant, and dinner will be ready before you know it!