
If you think coconut ice cream from the store is good, wait until you taste homemade. This recipe will ruin you for every commercial brand forever.
I’ve been making this coconut ice cream recipe homemade version for years now. It started when I couldn’t find decent coconut ice cream anywhere—Baskin Robbins didn’t cut it.
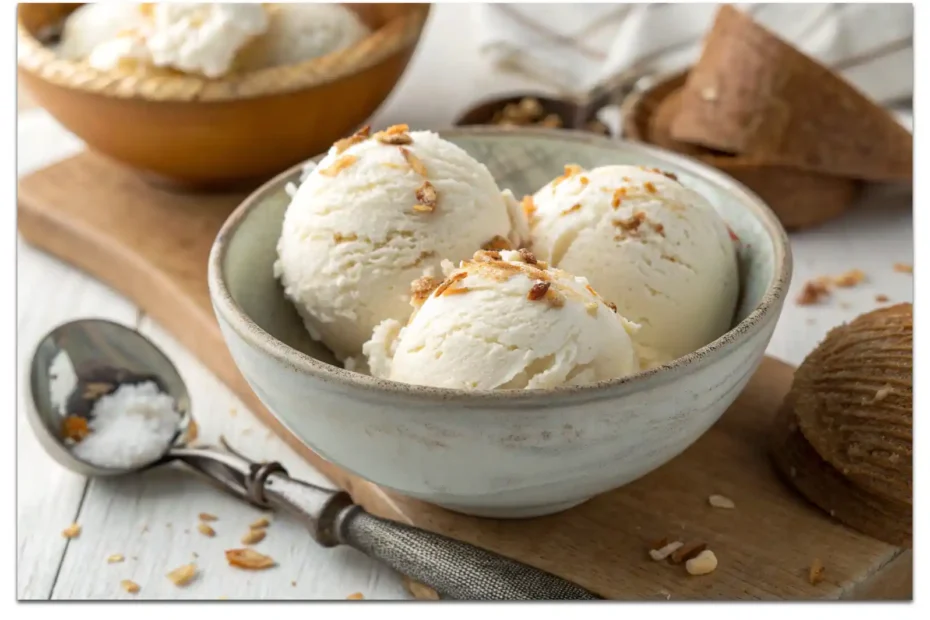
This home made coconut ice cream features rich coconut flavor, creamy texture, and toasted coconut flakes. It’s everything coconut lovers dream about in frozen dessert form.
Prep Time: 15 minutes
Chill Time: 4-6 hours (or overnight)
Churn Time: 20-25 minutes
Total Time: 5-7 hours
Servings: 1 quart (about 8 scoops)
Why This Coconut Ice Cream Works
Most coconut milk ice cream recipe versions either taste icy or lack real coconut punch. This one solves both problems with full-fat coconut milk and cream.
Using both canned coconut milk recipes ingredients and heavy cream creates that signature rich texture. You get intense coconut flavor without sacrificing creaminess at all.
Toasting the coconut flakes before mixing them in adds depth. Raw coconut tastes flat—toasted coconut brings nutty, caramelized notes that elevate everything dramatically.
IMO, this beats any natural ice cream shop version because you control everything. More coconut flavor? Add it. Less sweet? Adjust the sugar yourself.
Ingredients You’ll Need
Here’s everything for this freshly churned coconut ice cream masterpiece. Simple ingredients that create incredible results—nothing weird or hard to find required.
For the Ice Cream Base:
- 1 can (13.5 oz) full-fat coconut milk
- 1 1/2 cups heavy cream
- 3/4 cup granulated sugar
- 1/4 teaspoon salt
- 1 tablespoon vanilla extract
- 1 teaspoon coconut extract
- 4 large egg yolks (for custard base)
For Mix-ins:
- 1 cup sweetened shredded coconut, toasted
- Optional: 1/2 cup chocolate chips or chopped almonds
Using full-fat coconut milk instead of light makes all the difference. Light coconut milk creates icy, sad ice cream that nobody actually wants to eat.
Equipment You’ll Need
Before we start, let’s talk about what you need equipment-wise. You have options depending on what’s already in your kitchen and your budget.
Ice Cream Maker: Traditional churning machines work great. They freeze while churning, creating smooth texture through constant movement and air incorporation throughout.
Ninja Creami: If you have one, this coconut milk ninja creami recipe works perfectly. Freeze the base solid, then process—it’s the easiest method available.
No-Churn Method: No machine? No problem. Make this as coconut no churn ice cream by whipping everything and freezing. More on that method later.
Whatever method you use, you’ll also need mixing bowls, a whisk, and an ice cream scoop for serving. That’s it—nothing fancy or specialized beyond that.
How To Make Perfect Coconut Ice Cream
Alright, let’s get into the actual process. I’ll walk you through every step with all the details that actually matter for success here.
Step 1: Toast Your Coconut
Spread shredded coconut on a baking sheet in an even layer. Bake at 350°F for 5-7 minutes, stirring every 2 minutes to ensure even browning.
Watch it closely because coconut burns fast. You want golden brown, fragrant coconut—not dark brown or burnt pieces that taste bitter and wrong.
Once toasted, remove immediately and let it cool completely on the pan. Set aside about 3/4 cup for mixing in and save the rest for topping.
This step is non-negotiable. Toasted coconut adds so much more flavor than raw coconut flakes. Don’t skip it even if you’re tempted to save time.
Step 2: Make the Custard Base
In a medium saucepan, combine the coconut milk, heavy cream, and half the sugar (about 6 tablespoons). Heat over medium heat, stirring occasionally until hot.
Don’t let it boil—just heat until you see steam rising and tiny bubbles forming around the edges. This takes about 5-7 minutes of gentle heating.
While that heats, whisk the egg yolks with the remaining sugar in a separate bowl until the mixture turns pale yellow and slightly thick.
This custard base creates that ultra-creamy texture that makes premium ice cream special. Skipping the eggs gives you ice cream, but not the good stuff.
Step 3: Temper the Eggs
Slowly ladle about half a cup of the hot coconut milk mixture into the egg yolks while whisking constantly. This gradually raises the egg temperature safely.
Add another ladle of hot liquid, whisking continuously. You’re tempering the eggs so they don’t scramble when they hit the full heat later.
Pour the tempered egg mixture back into the saucepan with the rest of the hot coconut milk. Whisk everything together thoroughly and smoothly now.
Rushing this step creates scrambled eggs in your ice cream base. Nobody wants that. Take your time here—proper tempering makes all the difference.
Step 4: Cook the Custard
Return the pan to medium-low heat. Cook, stirring constantly with a wooden spoon or silicone spatula, for about 5-8 minutes until it thickens.
You’ll know it’s ready when the custard coats the back of your spoon and holds a line when you drag your finger through it. This is crucial.
The mixture should reach about 170-175°F if you’re using a thermometer. It’ll thicken noticeably and look glossy rather than thin and milky like before.
Remove from heat immediately once thickened. Overcooking scrambles the eggs or makes the custard grainy—neither outcome is acceptable for good ice cream.
Step 5: Add Flavorings and Cool
Stir in your vanilla extract, coconut extract, and salt while the custard is still hot. The heat helps the flavors distribute evenly throughout.
Pour the hot custard through a fine-mesh strainer into a clean bowl. This catches any bits of cooked egg or coconut solids for ultra-smooth texture.
Let it cool at room temperature for about 20 minutes, stirring occasionally. Then cover with plastic wrap pressed directly onto the surface to prevent skin.
Refrigerate for at least 4 hours or overnight. The mixture needs to be completely cold before churning—warm bases don’t churn properly and stay soupy.
Step 6: Churn the Ice Cream
If using a traditional ice cream maker, pour your chilled base into the machine. Follow the manufacturer’s instructions for churning time—usually 20-25 minutes.
The ice cream scoop test: It’s ready when it looks like soft-serve and holds its shape. It won’t be rock hard—that happens during final freezing.
For ninja creami coconut milk ninja creami recipe method: Freeze the base solid in the Creami container for 24 hours, then process on the ice cream setting.
During the last 5 minutes of churning, add your toasted coconut flakes. This distributes them evenly without breaking them into tiny, unrecognizable pieces throughout.
Step 7: Final Freeze
Transfer the churned ice cream to a freezer-safe container. Press parchment paper directly on the surface before sealing the lid tightly shut.
Freeze for at least 4 hours until firm enough to scoop properly. This hardening time allows the texture to set and the flavors to develop further.
The ice cream will be soft-serve consistency after churning. The final freeze brings it to that perfect scoopable texture you’re after for serving.
If you want that ice cream aesthetic for photos, let it sit at room temperature for 5 minutes before scooping. This creates beautiful ice cream snaps.
No-Churn Method
Don’t have an ice cream machine? Make this coconut no churn ice cream version instead. The texture is slightly different but still incredibly delicious overall.
Skip the custard-making steps entirely. Just whip 2 cups heavy cream to stiff peaks in a large bowl using an electric mixer on high speed.
In another bowl, whisk together one can of sweetened condensed milk, one can of coconut milk, vanilla, and coconut extract until smooth and well combined.
Gently fold the whipped cream into the coconut mixture. Add your toasted coconut flakes and fold again just until combined without deflating the cream.
Pour into a loaf pan, cover tightly, and freeze for 6 hours minimum. The whipped cream creates air bubbles that keep it creamy without churning.
Variations Worth Trying
Once you’ve nailed the basic coconut ice recipe, these variations let you explore different flavor combinations while keeping that coconut base everyone loves.
Chocolate Coconut: Fold in 1/2 cup mini chocolate chips after churning. This creates a homemade version of those chocolate-coconut ice cream bars everyone loves.
Almond Coconut: Add 1 teaspoon almond extract and fold in 1/2 cup toasted slivered almonds. This almond ice cream twist is absolutely incredible together.
Pineapple Coconut: Fold in 1/2 cup finely chopped dried pineapple. You get that piña colada vibe in frozen dessert form—tropical paradise achieved.
Coconut Lime: Add 2 tablespoons lime zest and 2 tablespoons lime juice to the base. Bright, tangy, refreshing—perfect for summer heat waves.
You could even turn this into a coconut ice cream dessert by serving it with fresh fruit, chocolate sauce, or as part of an ice cream sandwich.
Comparing to Store-Bought Options
How does this stack up against commercial brands? Let me break it down from years of eating both homemade and store-bought coconut ice cream.
Versus Baskin Robbins: Their coconut ice cream is okay but has that artificial flavor. This tastes like real coconut because it actually uses real coconut.
Versus Cornetto Ice Cream: Those are convenient for grab-and-go but lack depth. Homemade delivers complex flavor and better texture without preservatives or stabilizers.
Versus Natural Ice Cream Brands: Premium brands come close but cost three times as much. Making it yourself gives you the same quality for less money.
Versus Coconut Milk Dessert Alternatives: Dairy-free store brands often taste icy. This has cream for richness but could be made vegan by using all coconut cream.
Each has its place, but nothing beats freshly churned coconut ice cream you made yourself. The flavor and texture simply can’t be matched commercially.
Storage and Serving Tips
Let’s talk about keeping this ice cream perfect. Homemade stuff doesn’t have commercial stabilizers, so storage technique matters more than you’d think here.
Storage: Keep in an airtight container with parchment pressed on the surface. This prevents ice crystals and freezer burn from ruining your beautiful creation.
Shelf Life: Eat within 2 weeks for best quality. After that, ice crystals form and texture degrades. Not dangerous, just not as pleasant to eat.
Scooping: Let it sit at room temperature for 5-10 minutes before scooping. Homemade ice cream freezes harder than store-bought because it lacks stabilizers.
Serving: Use a warm ice cream scoop (dip in hot water between scoops). This creates those perfect round balls that look professional and photograph beautifully.
FYI, if it gets too icy after storage, let it thaw slightly, re-churn briefly, and refreeze. This refreshes the texture and breaks up ice crystals effectively.
Common Mistakes to Avoid
I’ve messed this up enough times to know exactly what goes wrong. Here’s how to avoid the disasters that ruin perfectly good coconut milk dessert attempts.
Not Chilling Base: Churning warm base creates soupy ice cream that never firms up properly. Always chill completely—overnight is ideal for best results here.
Skipping Tempering: Dumping eggs into hot liquid scrambles them. Take the time to temper properly or you’ll have chunks in your final product.
Over-churning: Churning too long makes the ice cream grainy and butter-like. Stop when it reaches soft-serve consistency, not before, not after that.
Too Much Mix-in: Adding too many coconut flakes or other mix-ins makes it hard and icy. Keep mix-ins to about 1 cup maximum per batch.
Wrong Coconut Milk: Light coconut milk lacks fat for creaminess. Always use full-fat canned coconut milk—this is not the time to cut calories or corners.
Pro Tips for Ice Cream Shop Quality
Want your homemade version to rival premium ice cream shops? These expert tips make all the difference between good ice cream and exceptional ice cream.
Quality Ingredients: Use good vanilla extract and fresh coconut. Cheap ingredients taste cheap—this is a simple recipe where quality shows dramatically in results.
Chill Everything: Cold bowl, cold base, cold ice cream maker container. Everything cold makes churning faster and more efficient, creating better texture throughout.
Don’t Over-sweeten: Sugar affects texture, not just taste. Too much prevents proper freezing. Stick to the recipe amounts for best consistency and flavor balance.
Toast Fresh Coconut: Old coconut tastes stale and flat. Fresh coconut toasted right before using delivers that intense, aromatic flavor you’re chasing here.
Proper Freezing: Freeze at the coldest setting your freezer has. Fast freezing creates smaller ice crystals, which means smoother, creamier final texture overall.
Perfect Pairings and Serving Ideas
This coconut ice cream recipe machine or hand-churned creation pairs beautifully with so many desserts. Here are my favorite combinations after years of experimentation.
Warm Brownies: The cold coconut against warm chocolate is heaven. The temperature and flavor contrast creates an unforgettable dessert experience for everyone.
Fresh Tropical Fruit: Serve with mango, pineapple, or passion fruit. The fruit adds freshness that balances the rich, creamy coconut perfectly together.
Chocolate Sauce: Simple chocolate syrup or homemade hot fudge. Chocolate and coconut is a classic combination that never gets old or boring.
Pie or Cake: Use it as the à la mode addition to coconut cream pie, chocolate cake, or fruit crisps. Elevates any dessert instantly.
Affogato Style: Pour a shot of hot espresso over a scoop. The coffee complements coconut surprisingly well for a sophisticated adult dessert option.
Making It Vegan
Want to make this completely dairy-free? Replace the heavy cream with full-fat coconut cream for a vegan coconut milk ice cream recipe variation.
Use 2 cans of full-fat coconut milk total—refrigerate them overnight, then scoop out the thick cream from the top, discarding the watery liquid below.
Skip the egg yolks and add 2 tablespoons cornstarch to thicken the base instead. Heat until it thickens like pudding, then cool and churn normally.
The texture will be slightly different—still creamy but not quite as rich as the custard base version. It’s excellent and entirely plant-based though.
You get that natural ice cream quality without any animal products. Perfect for dairy-free friends or anyone following a vegan lifestyle while craving dessert.
FAQs
Can I make this without an ice cream maker?
Yes! Use the no-churn method with whipped cream and sweetened condensed milk. Freeze in a pan for 6+ hours. It’s slightly less smooth but still delicious.
Why is my ice cream icy and not creamy?
Usually from not enough fat or churning warm base. Make sure you use full-fat coconut milk and heavy cream. Always chill the base completely before churning.
How do I prevent ice crystals?
Press parchment directly on the ice cream surface before freezing. Store in an airtight container. Eat within 2 weeks for best texture and minimal crystallization.
Can I reduce the sugar?
You can reduce by 2-3 tablespoons, but sugar affects texture, not just sweetness. Too little makes it freeze rock-hard and icy. Stick close to recipe.
What if I don’t have coconut extract?
It’s optional but recommended for intense flavor. You can skip it or substitute with 1/4 teaspoon almond extract for a different but still delicious flavor profile.
Coconut Ice Cream Recipe: Better Than Any Store Brand
8
Scoops5
hoursThis homemade coconut ice cream uses full-fat coconut milk, heavy cream, and egg yolks to create a rich custard base. Churned with toasted coconut flakes, it delivers intense coconut flavor and creamy texture. Requires ice cream maker or no-churn method, takes about 5-7 hours including chilling and freezing time.
Ingredients
- Ice Cream Base:
-
1 can (13.5 oz) full-fat coconut milk
-
1 1/2 cups heavy cream
-
3/4 cup granulated sugar
-
1/4 teaspoon salt
-
1 tablespoon vanilla extract
-
1 teaspoon coconut extract
-
4 large egg yolks
- Mix-ins:
-
1 cup sweetened shredded coconut, toasted
-
Optional: 1/2 cup chocolate chips or chopped almonds
How To Make Coconut Ice Cream
- Toast shredded coconut at 350°F for 5-7 minutes, stirring every 2 minutes
- Let toasted coconut cool completely
- Combine coconut milk, cream, and half the sugar in saucepan
- Heat over medium until steaming (don’t boil)
- Whisk egg yolks with remaining sugar until pale
- Slowly ladle hot mixture into yolks while whisking (tempering)
- Pour tempered yolks back into saucepan
- Cook over medium-low 5-8 minutes, stirring constantly until thickened
- Remove from heat when custard coats spoon
- Stir in vanilla extract, coconut extract, and salt
- Strain through fine-mesh strainer into clean bowl
- Cool at room temperature 20 minutes
- Cover with plastic wrap pressed on surface
- Refrigerate 4 hours or overnight until completely cold
- Pour chilled base into ice cream maker
- Churn 20-25 minutes until soft-serve consistency
- Add toasted coconut during last 5 minutes of churning
- Transfer to freezer-safe container
- Press parchment on surface and seal lid
- Freeze 4+ hours until firm enough to scoop
Final Thoughts on Coconut Ice Cream
So there you have it—everything you need to make incredible coconut ice cream at home. This recipe has spoiled me for store-bought forever honestly.
It’s rich, creamy, and packed with real coconut flavor that commercial brands can’t match. The toasted coconut adds texture and depth that makes it special.
Once you make this a few times, it becomes automatic. You’ll find yourself making it constantly during summer and surprising guests with homemade ice cream.
Now stop reading and start churning. Your freezer deserves this tropical frozen perfection, and your taste buds will thank you forever. Get cooking!