
So you’re craving something crispy, sweet, and totally addictive? Let me guess—you’ve had those amazing coconut shrimp at a restaurant and thought, “I need this in my life, like, right now.” Well, you’re in luck because making homemade coconut shrimp is way easier than you think.
I remember the first time I tried making these beauties at home. I was skeptical, honestly. Could I really recreate that Chinese buffet coconut shrimp magic in my own kitchen? Spoiler alert: I absolutely could, and you can too.
Prep Time: 20 minutes
Cook Time: 15 minutes
Total Time: 35 minutes
Servings: 4 people
Why Coconut Shrimp Rocks
Have you ever wondered why coconut shrimp shows up on every appetizer menu? It’s because the combination is pure genius. The sweetness of coconut paired with succulent shrimp creates this flavor bomb that’s hard to resist.
Here’s the thing about this recipe—it’s incredibly versatile. You can make it as a fancy dinner party starter or just whip it up on a Tuesday because you deserve something special. IMO, that’s the beauty of learning how to make coconut shrimp at home.
Plus, when you make it yourself, you control everything. The crunch level, the sweetness, even the size of the coconut flakes. Store-bought versions can’t compete with that level of customization.
What You’ll Need (The Ingredients Breakdown)
Let me walk you through what you need for this easy coconut shrimp recipe. Nothing too fancy here, just good quality ingredients that’ll make your taste buds do a happy dance.
For the Shrimp:
- 1 pound large shrimp (peeled and deveined, tails on)
- 1 teaspoon salt
- 1/2 teaspoon black pepper
- 1/2 teaspoon garlic powder
For the Coating:
- 1/2 cup all-purpose flour
- 2 large eggs
- 1 tablespoon water
- 1 1/2 cups sweetened shredded coconut
- 1 cup panko breadcrumbs
- Vegetable oil for frying (about 2 cups)
Now For the Coconut Shrimp Dipping Sauce:
- 1/2 cup orange marmalade
- 2 tablespoons sweet chili sauce
- 1 tablespoon lime juice
- 1/4 teaspoon red pepper flakes (optional)
See? Nothing wild. You probably have half of this stuff already sitting in your pantry right now.
Getting Your Shrimp Ready
First things first—prep your shrimp properly. This step is crucial, so don’t skip it just because you’re hungry and impatient (I see you).
Pat those shrimp completely dry with paper towels. Seriously, get them as dry as possible. Wet shrimp won’t hold the coating well, and nobody wants sad, naked shrimp floating around in oil.
Season your cooked shrimp with salt, pepper, and garlic powder. Mix it all together so every single shrimp gets some love. This base seasoning makes a huge difference in the final flavor, trust me.
Let them sit for about 5 minutes while you set up your coating station. This gives the seasoning time to work its magic.
Setting Up Your Coating Station
Here’s where things get fun. You’re going to create what I call the “assembly line of deliciousness.” FYI, organization here saves you from a messy disaster later.
Grab three shallow bowls or plates. In the first one, add your flour. In the second, whisk together the eggs and water until smooth and, In the third, mix your shredded coconut and panko breadcrumbs thoroughly.
Why panko? Because regular breadcrumbs are boring, and panko gives you that extra crunch that makes coconut crusted shrimp absolutely irresistible. The combination of coconut and panko creates this double-crunch situation that’s next level.
Make sure your mixing station is set up in order: flour, egg wash, then coconut-panko mixture. This order matters because science (and also because it just works better).
The Coating Process (Where Magic Happens)
Alright, time to get your hands dirty. Take each shrimp by the tail and dredge it through the flour first. Shake off any excess—you want a light coating, not a flour monster.
Next, dip it into the egg wash. Make sure it’s completely covered. The egg acts like glue for your coconut coating, so don’t be shy here.
Finally, press the shrimp into the coconut-panko mixture. Really press it in there. Use your hands to pat the coating onto the shrimp so it sticks properly. You want full coverage.
Place each coated shrimp on a clean plate. Don’t stack them or they’ll stick together, and you’ll cry. I’ve been there, and it’s not pretty.
The Frying Technique
Now for the main event. Pour about 2 inches of vegetable oil into a heavy-bottomed pot or deep skillet. Heat it over medium-high heat until it reaches 350°F.
How do you know it’s ready if you don’t have a thermometer? Drop a tiny piece of bread or coconut in. If it sizzles immediately and floats, you’re golden. Too hot and your shrimp will burn; too cool and they’ll be greasy.
Carefully place 4-5 shrimp in the oil at a time. Don’t overcrowd the pan—that drops the temperature and ruins everything. Each shrimp needs its personal space to get properly crispy.
Fry for about 2-3 minutes per side until they’re golden brown and gorgeous. The shrimp will float when they’re done, which is your cue to fish them out.
Use a slotted spoon or spider strainer to remove them. Place them on a plate lined with paper towels to drain excess oil. Work in batches until all your shrimp are fried.
The Baked Coconut Shrimp Alternative
Not feeling the whole deep-frying situation? I get it. Sometimes you want healthier options, and that’s totally cool. You can make baked coconut shrimp that’s almost as good.
Preheat your oven to 425°F. Line a baking sheet with parchment paper and spray it with cooking spray. Coat your shrimp exactly the same way as the fried version.
Arrange them on the baking sheet in a single layer. Give each one a light spray of cooking oil on top. This helps them crisp up nicely in the oven.
Bake for 10-12 minutes, flip them over, spray again, and bake for another 8-10 minutes. They won’t be quite as crispy as fried, but they’re still delicious and way less messy.
Making the Perfect Dipping Sauce
Listen, the sauce can make or break this dish. That coconut shrimp dipping sauce is essential, not optional. Don’t even think about skipping it.
In a small bowl, mix your orange marmalade, sweet chili sauce, lime juice, and red pepper flakes if you’re using them. Whisk it all together until smooth.
Taste it. Need more tang? Add more lime. Want it sweeter? Add a bit more marmalade. The beauty of homemade sauce is you can adjust it to your preferences.
Some people like a creamy coconut shrimp style with a mayo-based sauce. That’s cool too. Mix mayo with honey and a splash of sriracha for another amazing option.
What To Serve With Coconut Shrimp
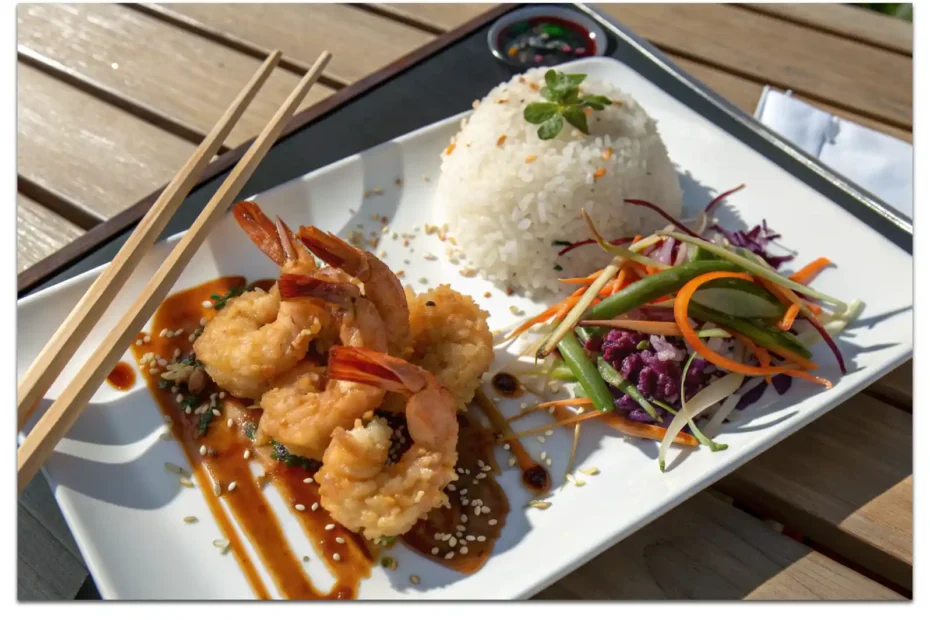
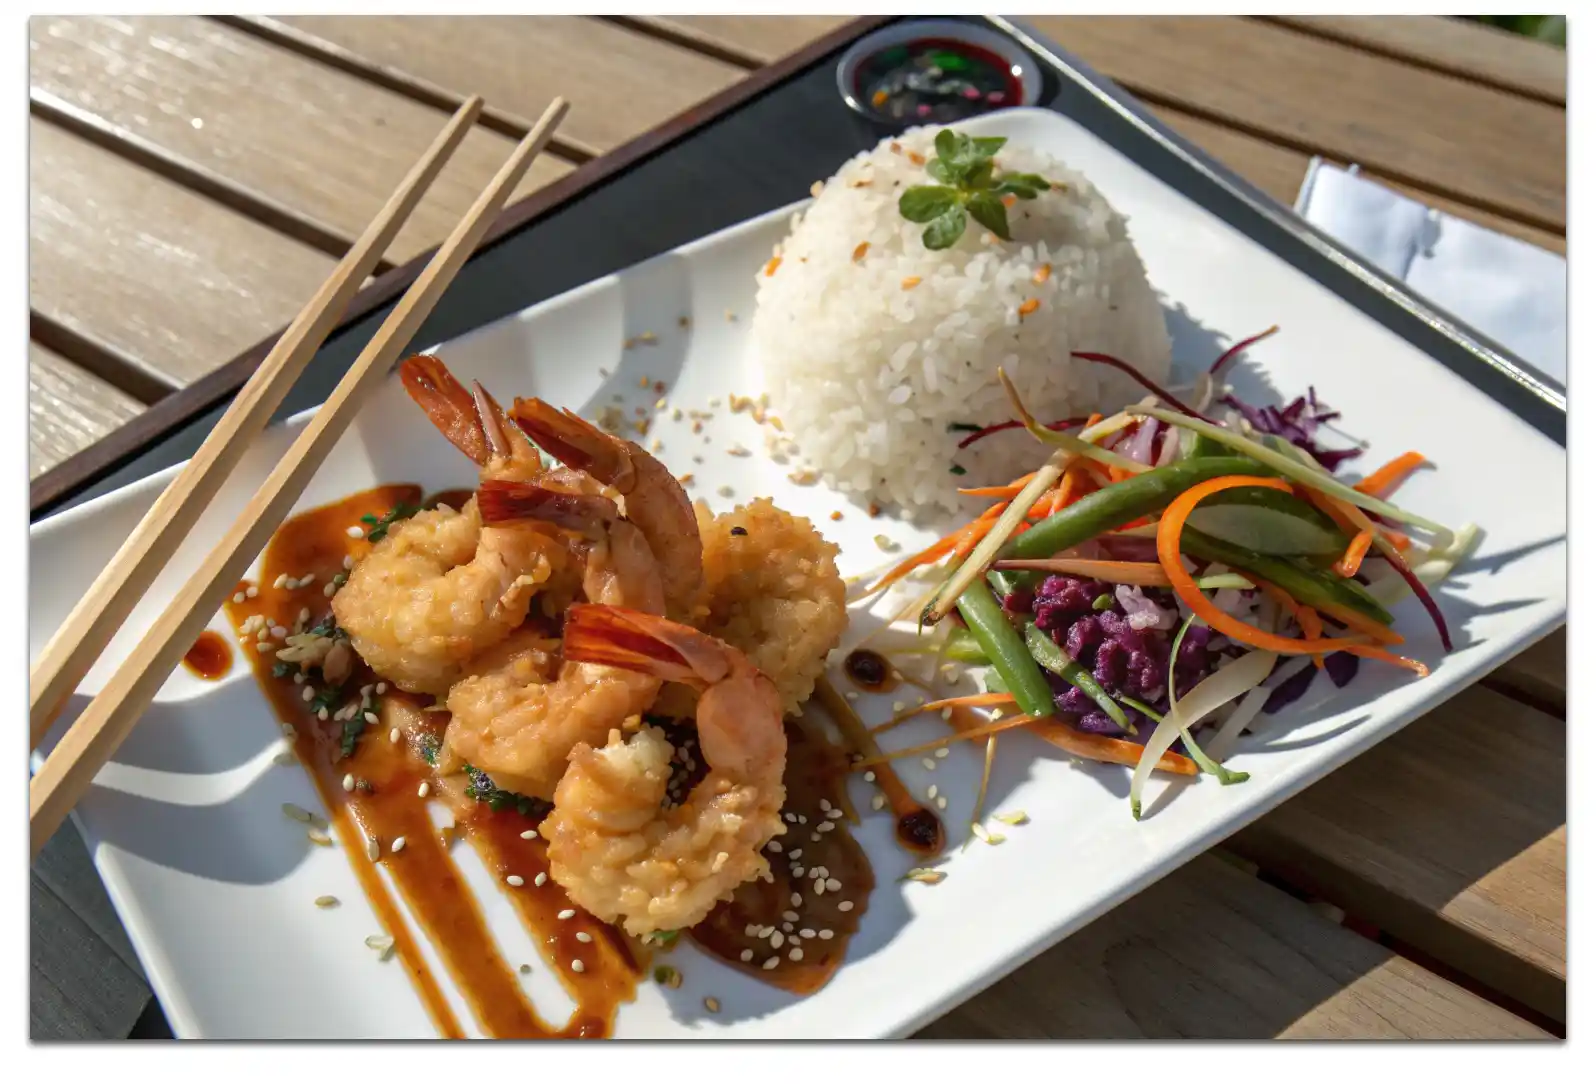
So you’ve got your gorgeous coconut shrimp with rice situation going on, but what else? Let me share some killer coconut shrimp sides that’ll complete your meal.
Rice is classic—try jasmine or basmati for something fragrant. You could also go with coconut rice to keep the theme going. Just cook your rice in coconut milk shrimp style for extra richness.
A fresh Asian slaw works perfectly here. Cabbage, carrots, cilantro, and a lime dressing cut through the richness beautifully. It’s crunchy, refreshing, and balances everything out.
For a full coconut shrimp dinner, add some stir-fried vegetables. Snow peas, bell peppers, and broccoli with a light garlic sauce complement the shrimp without competing for attention.
Want more protein? Try making coconut salmon using the same coating technique. It’s equally delicious and gives you variety if you’re serving a crowd.
Pro Tips for Perfect Results
After making these probably a hundred times, I’ve learned some tricks. These shrimp recipes coconut style benefit from cold shrimp—they hold the coating better.
Don’t skip the tail-on part. Yeah, they’re a bit messier to eat, but they give you something to hold onto while coating and eating. Plus, they look way more impressive.
Keep your oil temperature consistent. If it drops too much between batches, let it come back up to temperature before adding more shrimp. Patience pays off here.
Make extra coating mixture. You’ll probably use more than you think, and running out halfway through is annoying. Better to have leftovers than to scramble mid-recipe.
Storage and Reheating
Got leftovers? Lucky you. Store them in an airtight container in the fridge for up to 2 days. The coating will soften, but we’ll fix that.
To reheat, use your oven or air fryer—never the microwave unless you want soggy disappointment. Preheat your oven to 375°F and bake for about 8-10 minutes.
An air fryer is honestly the best reheating method. It crisps them back up beautifully in just 5 minutes at 350°F. They taste almost fresh.
Can you freeze them? Absolutely. Freeze them after coating but before cooking. Then you can fry them straight from frozen—just add a minute or two to the cooking time.
Common Mistakes to Avoid
Let’s talk about what not to do because I’ve made every mistake possible. Don’t use small shrimp—they cook too fast and dry out before the coating browns.
Avoid using unsweetened coconut unless you really prefer it. The sweetened version gives you that signature flavor everyone loves. It’s not the time to get health-conscious.
Don’t forget to season your flour. Some recipes skip this, but it makes the coating bland. Season every layer for maximum flavor.
Never crowd your pan when frying. I know you’re hungry and want them all done at once, but resist. Crowded shrimp = greasy, unevenly cooked disasters.
Variations to Try
Once you’ve mastered the basic recipe, experiment with these Asian shrimp recipes variations. Add some curry powder to your coating for a spicy twist.
Try using different nuts. Macadamia nuts crushed and mixed with coconut create this Hawaiian-style version that’s absolutely amazing. Pecans work great too.
For a spicier version, add cayenne pepper to your flour mixture. Or mix sriracha into your egg wash for heat throughout the coating.
Make mini versions using smaller shrimp for party appetizers. They’re pop-in-your-mouth perfect and always disappear first at gatherings.
Why Homemade Beats Takeout
Here’s the truth about restaurant coconut shrimp—they’re often sitting under heat lamps, getting soggier by the minute. Your homemade coconut shrimp comes out hot and crispy every single time.
Plus, you save money. Restaurant appetizers are really expensive for what you get. Making them at home costs a fraction and feeds more people.
You also control the quality. Better shrimp, better oil, fresher coconut. Everything tastes cleaner and more vibrant when you make it yourself.
And let’s be honest—there’s something satisfying about creating restaurant-quality food in your own kitchen. It’s impressive and tastes better because you made it.
Frequently Asked Questions
Can I use frozen shrimp for this recipe?
Absolutely! Just make sure to thaw them completely first. Pat them extra dry because frozen shrimp tend to release more moisture. Fresh shrimp work great too, but frozen is more convenient and usually cheaper.
What’s the best oil for frying coconut shrimp?
Vegetable oil or canola oil work perfectly because they have high smoke points and neutral flavors. Avoid olive oil—it smokes at lower temperatures and can overpower the coconut flavor. Peanut oil is another excellent choice if you’re not dealing with allergies.
How do I keep the coating from falling off?
The key is making sure your shrimp are completely dry before coating. Also, let the coated shrimp rest for 5 minutes before frying. This helps the coating adhere better. Don’t skip the flour step—it creates a base for everything else to stick to.
Can I make these ahead of time?
You can coat the shrimp a few hours in advance and keep them in the fridge until you’re ready to fry. For longer storage, freeze them after coating but before cooking. They’ll keep for up to a month in the freezer.
What if I don’t have panko breadcrumbs?
Regular breadcrumbs will work, but your shrimp won’t be quite as crispy. You can also crush cornflakes or crackers as a substitute. The panko really does make a difference in texture, so I’d recommend grabbing some if possible.
Coconut Shrimp Recipe: Your New Favorite Crispy Delight
4
servings35
minutesCrispy coconut shrimp features succulent shrimp coated in sweetened coconut and panko breadcrumbs, fried until golden brown. Served with a tangy-sweet orange marmalade dipping sauce, this restaurant-quality appetizer is surprisingly easy to make at home and always impresses.
Ingredients
-
1 pound large shrimp (peeled, deveined, tails on)
-
1 teaspoon salt
-
1/2 teaspoon black pepper
-
1/2 teaspoon garlic powder
-
1/2 cup all-purpose flour
-
2 large eggs
-
1 tablespoon water
-
1 1/2 cups sweetened shredded coconut
-
1 cup panko breadcrumbs
-
2 cups vegetable oil for frying
-
1/2 cup orange marmalade
-
2 tablespoons sweet chili sauce
-
1 tablespoon lime juice
-
1/4 teaspoon red pepper flakes (optional)
How To Make
- Pat shrimp dry and season with salt, pepper, and garlic powder
- Set up three bowls: flour in first, beaten eggs with water in second, coconut-panko mixture in third
- Dredge each shrimp in flour, dip in egg wash, then press into coconut mixture
- Heat oil to 350°F in a deep pot
- Fry shrimp in batches for 2-3 minutes per side until golden
- Drain on paper towels
- Mix marmalade, chili sauce, lime juice, and pepper flakes for dipping sauce
- Serve immediately while hot and crispy
Final Thoughts
Making creamy coconut shrimp (or crispy, in this case) at home isn’t rocket science. It’s about following the steps, being patient, and not being afraid to get a little messy.
The best part? Once you nail this recipe, you’ll never want to order it at a restaurant again. You’ll be that person who brings these to parties and watches them disappear in minutes.
So grab your ingredients, heat up that oil, and get ready for some seriously good eating. Your kitchen is about to smell absolutely incredible, and your taste buds are in for a treat.
Now stop reading and start cooking. Those shrimp aren’t going to coat themselves, and you’ve got a batch of crispy, coconutty perfection waiting to happen.