

You know that moment when you open your fridge and get hit with a bizarre combo of last night’s fish curry and this morning’s strawberries?
Yeah, not exactly the vibe we’re going for. Let me share some game-changing tricks that’ll keep your fridge smelling fresh and your food tasting like, well, actual food.
Why Your Fridge Smells Like a Science Experiment Gone Wrong
Ever wonder why everything in your fridge starts tasting like onions after a day or two? It’s not magic—it’s science, and honestly, it’s kind of annoying. Food releases gases and moisture as it sits, and these little particles love playing musical chairs with your other groceries.
Your fridge is basically a sealed box where all these smells hang out together. Without proper barriers, that garlic bread you stored becomes best friends with your chocolate cake. Trust me, nobody wants garlic-flavored dessert (okay, maybe someone does, but that’s weird).
The good news? You don’t need fancy equipment to fix this. Just some smart storage habits and a few affordable tools will transform your fridge from a chaotic smell party into an organized, fresh-smelling space.
The Power of Airtight Containers (Your New Best Friends)
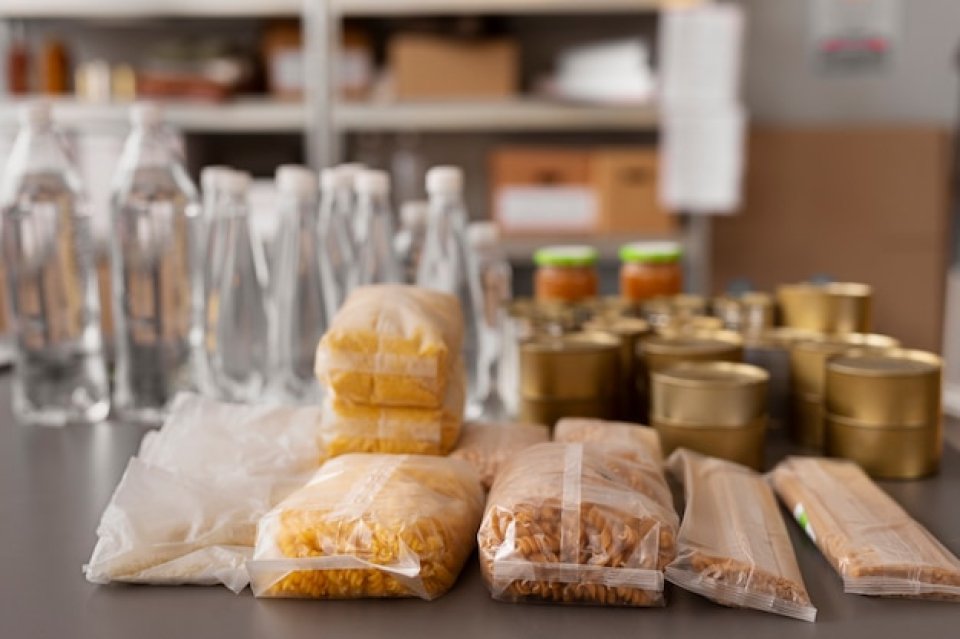
Glass containers with silicone seals are absolute champions at keeping smells contained. I switched to these about a year ago, and honestly, it changed my leftover game completely. They’re sturdy, microwave-safe, and actually keep the smell of last night’s salmon exactly where it belongs—inside the container.
Plastic containers work too, but here’s the catch: they absorb odors over time. That curry you stored three months ago? Yeah, the ghost of it still haunts that Tupperware. Glass doesn’t play those games—it stays neutral and clean.
Here’s what makes airtight containers worth it:
- They create a physical barrier between foods
- They prevent moisture from escaping and mixing
- They stack easily, saving fridge space
- They’re transparent, so you remember what’s inside (no more mystery meals!)
Pro tip: Always let hot food cool down before sealing it up. Trapping steam creates condensation, which leads to soggy food and potential bacterial growth. Not cute.
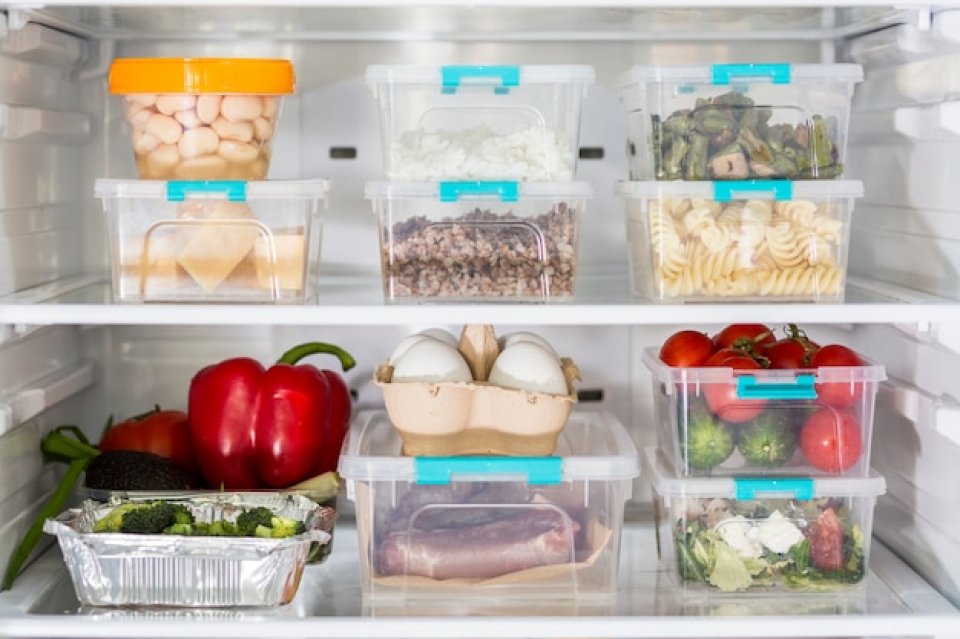
Strategic Food Placement: There’s Actually a Method to This Madness
Your fridge has different temperature zones, and placing food strategically makes a huge difference. The top shelves are warmer, while the bottom back section is coldest. Understanding this helps you store food more effectively and minimize smell transfer.
Strong-smelling foods like fish, onions, and leftover curry should always go on the bottom shelf. Why? Cold air sinks, and these intense odors are less likely to waft upward and contaminate everything else. It’s basically smell management 101.
Keep your dairy products and ready-to-eat items on upper shelves. Cheese, milk, and yogurt are sensitive to absorbing odors, so giving them prime real estate away from pungent foods protects their taste. Your morning coffee will thank you when your milk doesn’t taste like yesterday’s tacos.
Fruits and vegetables belong in the crisper drawers—shocker, I know. But seriously, these drawers have humidity controls that keep produce fresh longer. Just remember: fruits and veggies should be separated because fruits release ethylene gas that makes vegetables spoil faster.
Wrap It Right: Aluminum Foil vs. Plastic Wrap vs. Beeswax Wraps
Not all wrapping methods are created equal, FYI. Aluminum foil is great for wrapping meat and casseroles because it blocks odors pretty well. Plus, you can toss foil-wrapped items straight into the oven for reheating. Convenience level: expert.
Plastic wrap is clingy and creates a decent seal, but it’s not my favorite for super smelly foods. It works fine for covering bowls or wrapping sandwiches, but don’t expect miracles with that leftover shrimp scampi. It’s more of a lightweight contender in the smell-blocking arena.
Beeswax wraps have become trendy, and I get the appeal—they’re eco-friendly and reusable. They work wonderfully for bread, cheese, and vegetables. However, they’re not ideal for raw meat or extremely oily foods because they’re harder to clean and can trap bacteria.
My go-to strategy? Combine methods. Wrap smelly items in foil first, then place them in an airtight container. Double protection means double peace of mind, and your fridge will actually smell like a fridge, not a restaurant dumpster 🙂
Natural Odor Absorbers That Actually Work
Want to know a secret? Baking soda isn’t just for baking (mind blown, right?). Place an open box of baking soda in your fridge, and it’ll absorb odors like a champ. Replace it every three months for maximum effectiveness.
Activated charcoal is another powerhouse absorber. You can buy small pouches specifically designed for fridges. They’re more effective than baking soda and last longer—usually around two months before needing replacement. I keep one tucked in the back of my fridge, and it works wonders.
Coffee grounds are surprisingly effective too. Save your used coffee grounds, dry them out, and place them in a small bowl in your fridge. They neutralize odors and give your fridge a subtle coffee aroma instead of that mystery smell you can’t identify.
Fresh lemon slices or a cotton ball soaked in vanilla extract also help mask unpleasant odors. These aren’t long-term solutions, but they’re perfect quick fixes when you need your fridge to smell decent before guests arrive.
Temperature Control: Colder Isn’t Always Better
Here’s something most people don’t realize: keeping your fridge too cold can actually affect food quality and smell. The ideal temperature is between 35°F and 38°F (1.6°C to 3.3°C). Any colder, and you risk freezing items that shouldn’t be frozen.
When food partially freezes and then thaws, it releases moisture and breaks down cell structures. This creates more opportunities for smells to escape and mix. Plus, frozen-then-thawed food often tastes weird and develops off-putting textures.
Check your fridge temperature regularly with a thermometer. Those built-in gauges aren’t always accurate, IMO. A separate thermometer gives you real data so you can adjust settings as needed. It’s a small investment that prevents bigger problems down the road.
Separate Containers for Everything (Yes, Everything)
I used to be lazy about this—tossing multiple leftovers into one big container to save space. Big mistake. Huge. Flavors blend way faster when foods touch each other, even if they’re all cooked.
Invest in different sizes of containers so each leftover gets its own home. Pizza gets a container, pasta salad gets another, and that random piece of cake? Yep, its own container too. This might seem excessive, but trust me, it’s worth it.
Those divided containers with compartments are genius for meal prep. You can store an entire meal—protein, veggies, and carbs—in one container without flavors mixing. They’re perfect for people who like variety without the weird taste contamination.
Label everything with dates using masking tape and a marker. Nothing fancy needed. This helps you track freshness and prevents that awkward moment where you can’t remember if that chicken is three days or three weeks old. Safety first, friends.
The Immediate Refrigeration Rule
Here’s a rookie mistake: letting leftovers sit on the counter for hours before refrigerating. Food safety aside (because bacteria love room temperature), this practice also allows maximum smell release. Hot food literally steams out its aroma, which then permeates everything nearby.
Refrigerate leftovers within two hours of cooking. If it’s particularly hot weather, make that one hour. This minimizes both safety risks and smell distribution. Your fridge stays fresher, and your food maintains better quality.
For large batches of hot food, divide them into smaller portions before refrigerating. This helps them cool faster and prevents raising your fridge’s internal temperature. A giant pot of soup takes forever to cool down and warms up surrounding foods, creating condensation and smell issues.
Cleaning Your Fridge Regularly (I Know, Boring but Necessary)

Real talk: when was the last time you actually cleaned your fridge shelves? If you’re hesitating to answer, it’s probably been too long. Old spills and forgotten food bits create lingering odors that no amount of airtight containers can fix.
Do a weekly quick check where you toss expired items and wipe down any obvious spills. A mixture of warm water and white vinegar works perfectly—it cuts through grime and neutralizes odors naturally. No harsh chemicals needed, which is great because who wants their food tasting like bleach?
Monthly, pull everything out and give your fridge a deep clean. Remove shelves and drawers, wash them with dish soap, and let them air dry. Wipe down walls, check door seals, and clean the rubber gaskets where crumbs love hiding.
Don’t forget the drip pan underneath your fridge. This often-forgotten spot collects condensation and can smell absolutely terrible if neglected. Pull it out, wash it thoroughly, and your whole kitchen will smell better. You’re welcome.
Special Storage Tips for Notoriously Smelly Foods
Fish is the ultimate fridge villain. Store it in the coldest part of your fridge, wrapped tightly in foil, then placed in an airtight container. Better yet, consume fish within 24 hours because it deteriorates quickly and smells worse as it ages.
Onions and garlic are smell spreaders extraordinaire. After cutting them, store them in glass containers with tight lids. Never leave them wrapped loosely or in plastic bags—those smells will escape faster than you can say “garlic breath.”
Cheese is tricky because it needs to breathe but also needs containment. Wrap cheese in parchment or wax paper first, then place it in a partially open container or cheese bag. This prevents it from drying out while minimizing smell transfer.
Curry and other heavily spiced dishes benefit from double wrapping. Put them in a container, then place that container inside a plastic bag before refrigerating. Excessive? Maybe. Effective? Absolutely. Your cheesecake won’t taste like tikka masala anymore :/
The Freezer Option: Long-Term Storage Without the Smell Drama
If you’ve got leftovers you won’t eat within a few days, freezing beats refrigerating every time. Frozen food doesn’t release smells the same way refrigerated food does. Plus, proper freezing maintains quality for weeks or months.
Use freezer-safe containers or heavy-duty freezer bags that seal completely. Regular containers can crack in freezer temperatures, and flimsy bags allow freezer burn. Neither situation is ideal for taste or smell prevention.
Squeeze out excess air before sealing bags—air causes freezer burn and allows smells to develop. Think of it like vacuum-sealing lite. The less air, the better the preservation and the happier your future self will be.
Label frozen items with contents and dates. Trust me, three months from now you won’t remember if that mystery meat is chicken or pork. Clear labeling prevents confusion and reduces food waste, which saves money and reduces fridge clutter.
Quick Fixes When Smells Have Already Mixed
Okay, so prevention failed and everything tastes weird now. Don’t panic. Place a bowl of white vinegar in your fridge overnight—it absorbs strong odors surprisingly well. Remove all offensive-smelling foods first, obviously.
Activated charcoal bags work faster than baking soda for emergency deodorizing. Place several throughout your fridge and give them 24 hours to work their magic. They’re reusable too, so you’re not constantly buying replacements.
For containers that absorbed odors, wash them thoroughly with baking soda paste. Let them soak in warm water with a few tablespoons of baking soda for an hour. This usually eliminates stubborn smells that regular soap can’t touch.
If plastic containers are beyond saving, it’s time to let them go. Sometimes that curry smell has permanently bonded with the plastic on a molecular level. Glass containers don’t have this problem, which circles back to why they’re superior investments.
Creating a Fridge Organization System That Works
Zone your fridge by food type: dairy section, meat section, leftover section, produce drawers. When everything has a designated spot, you’re less likely to create chaotic smell combinations. Plus, you’ll actually find things without excavating.
Keep a “eat first” shelf near eye level for foods nearing expiration. This visual reminder reduces waste and ensures older leftovers get consumed before they morph into science projects. Out of sight really is out of mind with fridge contents.
Use clear, stackable containers that maximize vertical space. This prevents creating hidden corners where forgotten food lurks and rots. Every item should be visible and accessible—no archaeological digs required to find last Tuesday’s lasagna.
Maintain consistent container sizes when possible. They stack better, look neater, and honestly, it’s just more satisfying. I know it sounds obsessive, but organization genuinely helps with smell prevention because you remember what’s where.
The Bottom Line: Consistency is Key
Preventing smell mixing isn’t complicated, but it requires consistency. You can’t do these things once and expect permanent results. Make these habits part of your routine, and your fridge will stay fresh without much thought.
Start with good containers—invest in quality airtight glass containers. Add some odor absorbers, maintain proper temperatures, and clean regularly. These foundational habits cover 90% of smell prevention right there.
Remember, your nose knows best. If something smells off, trust your instincts and toss it. No leftover is worth food poisoning or a fridge that smells like a compost bin. Be ruthless with expired items, and your storage game will improve dramatically.
Small changes make big differences. You don’t need to overhaul everything overnight. Pick a few strategies that resonate with you, implement them consistently, and build from there. Your future self (and your taste buds) will definitely thank you.
FAQs
How often should I replace baking soda in my fridge?
Replace your fridge baking soda every three months for optimal odor absorption. After that, it loses effectiveness and just takes up space. Mark the box with the date you opened it so you remember when to swap it out.
Can I store different types of leftovers in the same container if they’re separated?
While divided containers help, strong-smelling foods can still transfer odors through air circulation within the container. For best results, store particularly pungent items like fish or curry in completely separate containers from mild foods.
Why does my plastic container still smell after washing?
Plastic is porous and absorbs oils and odors from food, especially from spicy or aromatic dishes. Try soaking it in baking soda solution or vinegar overnight. If the smell persists, the plastic has permanently absorbed the odor and should be replaced.
Is it safe to put hot food directly into the fridge?
You should let food cool slightly (about 30 minutes) but refrigerate within two hours total for food safety. Putting extremely hot food in the fridge raises the internal temperature and forces the appliance to work harder, potentially affecting nearby foods.
What’s the best way to store soup without it smelling up the fridge?
Store soup in tall, narrow glass containers with airtight lids rather than wide, shallow ones. Less surface area exposed means fewer smell particles escaping. Always ensure the lid is completely sealed and consider double-wrapping particularly aromatic soups.
Do expensive containers really make a difference?
Quality matters more than price. Good containers have silicone gasket seals that create true airtight closures, preventing smell leakage. Cheap containers often have flimsy lids that don’t seal properly, making them ineffective for odor control regardless of material.
How can I prevent my fridge from smelling like fish?
Store fish in its original packaging or wrapped in foil, then place it in an airtight container on the bottom shelf. Consume within 24 hours if possible. Keep a bowl of coffee grounds or activated charcoal nearby to absorb any escaping odors.